With release 2.x and onward, the the P.F.A.T. control system provides several innovative ways to control the messages present in every data stream. The PFAT features are available in the Pro, Basic, editions of SNIP. Lite copies of SNIP share the same code base, but many of these innovative features are disabled in the freely available Lite edition.
Using the PFAT Filter Dialog Controls
The Filter Dialog is shown below. A detailed review of the Filter controls settings follows. The general uses of message filtering in PFAT is discussed in this article. The Filter Msgs Dialog can be invoked on any parsed stream by right-clicking the streams content menu, of by clicking on the Filter icon in the PFAT display dialog.
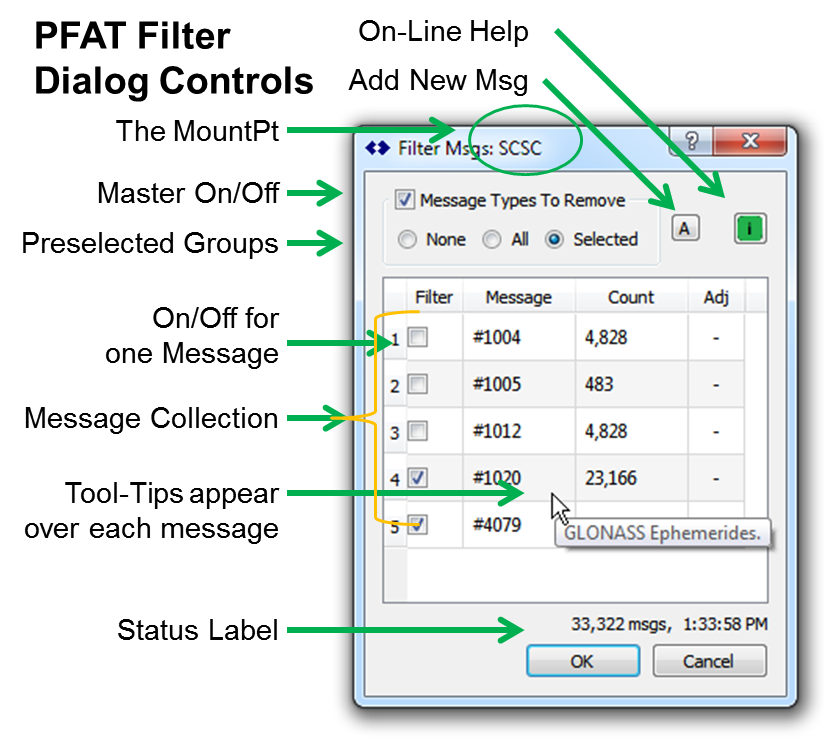
The window can resized as needed when there is a longer list of filtered messages.
The MountPt
The MountPt (the name of the stream which is being filtered) is shown in the window title.
Master On/Off
This check box enables or disables the use of filtering in this stream. When disabled, the messages selected to be filtered are kept in the list but are not used. This supports an easy method of switching filtering on or off without having to reenter the list of messages again.
Pre selection Groups
These radio buttons provide a simple means to change the state of all the check boxes for all messages en masse.
Individual Messages Types
Each message has its own check box to enable or disable filtering it. The count value shows how many messages have been decoded since parsing was last restarted. The Adj cell is not used at this time.
![]()
ToolTip Use
A tool tip with the formal name of each message is displayed when the user hovers over the message type (MT) cell.
Status Label
The status label is updated at a ~1Hz rate and briefly reflects any changes made. The local time and a count of all messages received by this data stream are displayed.
Ok / Cancel Buttons
The Ok button accepts the edits, installs them in the filter and closes the dialog.
The Cancel button discards any edits and closes the dialog, making no changes.
Adding a New Message Type
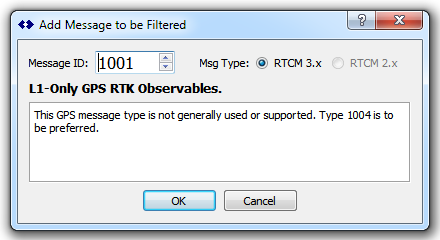
It is easy to select and filter message types which are present in the stream when the Filter dialog is open. But what about adding a message that is not currently displayed in the stream?
The Add New Message Button is used for this. When pressed, a secondary dialog appears as shown below. This dialog allows adding a filter for any valid message type (MT) found in the RTCM3 standard. This includes private messages, experimental messages, and MTs have not yet been defined by RTCM SC-104.
Note: At this time only the RTCM 3.x message types (MT) are supported by PFAT filtering. (Support for RTCM 2.x messages is planned).
Message ID:
The Message ID is set by a spin box, used to select the value of the desired MT value.
The bold text line below the Message ID value is the formal name of the RTCM3.x message, the same as is used in the RTCM3 cheat sheet page.
The text box below that provides commentary on the general use of the message, using the same text found in the RTCM3 message list, the cheat sheet web pages, and SNIP itself.
Use:
To add a new message type, simply set the spin box to the desired value and press Ok.
Pressing Cancel exits the dialog without make any changes or additions.