From Rev 3.19 onward, SNIP contains processing tools to automate the creation of RINEX files from the raw files that can be saved for each stream (typically binary RTCM3.x messages). [Hint: To save a raw file from a given data stream, right click on it and select the menu item “Log raw data”] The various setting and controls used for this are organized as part of the Data Logging Settings dialog and are discussed further in this article.
Background
RINEX, which stands for Receiver Independent Exchange Format, was developed by the International GNSS Service (IGS) and is now standardized by both the IGS RINEX Committee and by RTCM SC104. RINEX is a textual (human readable) way to express common GNSS measurements such as the range and phase observations regardless of the GNSS model or manufacturer being used. When you submit your base station file to a third party processing site such as OPUS or NRCan to obtain the precise position of the antenna, the format needed by such tools is RINEX (this article describes the process of locating your antenna in more detail). RINEX is a mature format and is widely supported. The current release is version 4.02 (Oct 2024) but older release formats (such as versions 3.x and 2.11) still enjoy wide support. See also: https://en.wikipedia.org/wiki/RINEX
The Dialog Box
Here we are concerned with the section of the Data Logging Settings dialog enclosed by the checkbox marked Post-Process to Create RINEX files.
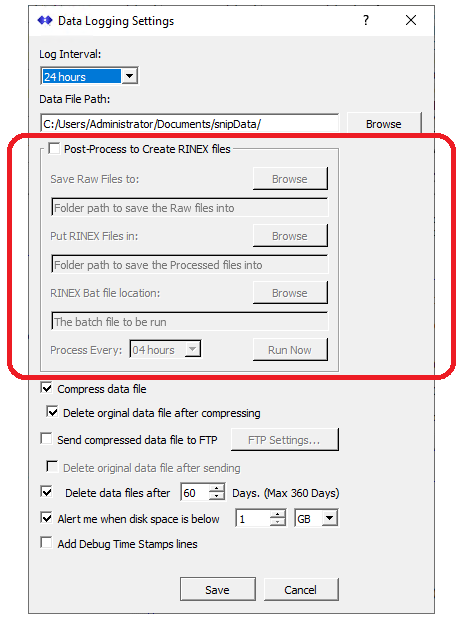
RINEX Processing Flow
The basic process flow for any base station data stream which is being logged is as follows:
- When new data from the base arrives, SNIP logs that data to the current logging file.[spacer height=”20px”]
- When the “Log Interval” has been reached (aligned with the local clock), the raw data file is closed and another one is opened. These files are named using the stream name (base station mountPt name) as well as appending a date and time to make identifying them easier.[spacer height=”20px”]
- If the checkbox Post Process to Create RINEX files has been checked (indicating that RINEX processing is active) then every time a raw data file is completed, a copy of it is placed into the folder indicated by the Save Raw Files to. The RINEX process will operate on the files found in this directory. This file is deleted when processing is completed, but this can be controlled in the script file.[spacer height=”20px”]
- When the RINEX run time interval has been reached, the batch script or program indicated by the RINEX Bat File location will be run. This allows the SNIP operator to run (and customize) any tool desired for the processing. Many GNSS vendors (if not most) have a RINEX processing tool they can provide, and there are many such free tools widely available. In the section below we discuss settings using the common rtkconv.exe tool that is part of the popular RTKLIB tools (available for download at http://rtkexplorer.com/ or at https://www.rtklib.com/ ). Formatting details and data decimation rates are easily set in the batch file and passed in the command line to the program to be run.[spacer height=”20px”]
- When the RINEX processing tool is run, it will then convert all matching files that are found in the Save Raw Files to. The resulting output files, in the desired RINEX format, are then placed into the folder defined by the control marked Put RINEX File in. The SNIP console log also reflects the status of the processing as the script runs.[spacer height=”20px”]
- These files can then be submitted to another site (OPUS, NRCan or others) for processing. In some deployments the folder Put RINEX File in is also made into an FTP site to allow other parties to gather the RINEX files.[spacer height=”20px”]
Once set up, this process will update and complete without operator intervention. But the accumulation of large data files may be an issue that will require periodic maintenance to avoid running out of disk space.
A few further remarks can be made about the three control settings…
Saving the Files
Select a folder with sufficient room to save the anticipated files. Ensure that SNIP can write to this location. Do not select a drive that has slow file write rates (such as various attached long term storage that some Virtual machine configurations may offer). Slow hard drives will in turn cause SNIP to be slower when potentially many files must be copied at the top of the hour (or whatever interval you have set). This is particularly important if you will be logging data from dozens of streams at the same time.
Post Processing the output Files
Similar advice can be made for the output side (have sufficient space, avoid slow drives). You may wish to create lines in the batch file to compress the RINEX file. As it is a simple text file, the common ZIP file process will provide ~90% compression rates.
It can be very useful to set up an FTP or SFTP server for the output folder as well. There are many tools to allow you to do this. One tool we have successfully used and would highly recommend is Cerberus available from https://www.cerberusftp.com/ who also make the popular FileZilla FTP client tool.
The Program and Batch file
The heart of the process is the batch script file. This file is run (once) when the RINEX run time interval has been reached. It gathers a list of matching files from the folder and then runs the RINEX conversion tool for each file, passing in various command line arguments needed to produce the desired output.
It is described in further detail in a line by line fashion in this related article (link to be provided). It is likely you will need to edit it to fit your own unique needs.
Note that you can use the script as is but will need to download and install the RTKLIB rtkconv.exe tool from one of the links mentioned above.
Hint: At the bottom of the Data Logging Settings dialog is a checkbox marked Add Debug Time Stamps Line When checked this will add a precise UTC time stamp to every line written to the raw file. This can be of value when debugging.