This article describes how to use the IP dialog found in SNIP to enter a single IP, or a range of IPs, when blocking (banning) or exempting (allowing) remote connections to your NTRIP Caster.
Any IP that is blocked is prevented from connecting to your NTRIP Caster. The block can temporary, (in that it expires and is automatically removed after a period of time allow the IP to connect again). Or it can be permanent, in that it is never automatically removed. The IP banning logic, when enabled, detects repeating problematic connections to the Caster and will automatically block the offending IP for the period of time you have selected. See this article for further details on how to setup the thresholds and other values used.
An IP can also be exempted from ever being blocked. Such IPs are never blocked by the IP banning logic. This is used when you have a range of “trusted” IPs you never wish to have blocked, regardless of any abuse by those connections. A similar exempt list is provided for NTRIP Client user agent strings. See this article for further details on how to setup these values.
In the IP Banning Dialog you can also select if blocking and unblocking events are to be reported in the console log. In a smaller Caster when such events not common, you may want to see these messages. In a large caster with many public users and constant bad connections, you may prefer to not see them. Keep in mind that SNIP is performing a software firewall with these features. If you have also enabled firewall rules on the host machine (or a router), SNIP will never see any connection you have prohibited there. See this article for further details. [In general it is more effective in terms of machine MIPS to have SNIP do the filtering.]
This dialog was introduced in SNIP Rev 3.13 and replaces a simpler dialog found in prior editions of SNIP. In the earlier dialog only one range of IPs was supported, always covering the lowest byte (often expressed as a range like xx.xx.xx.* or a CIDR /24 range).
In this new dialog the IP range can be set between any two independent values as required. This allows blocking (or allowing – in other words exempting from being blocked) large sections of the public or private internet when desired.
In various reports the resulting IP ranges are also now shown, typically as a two-line textual note in the form of “x.x.x.x to x.x.x.x” in the tables. Links to single IP values in dialogs continue to go a geo-location report about the IP and how it has been used for connections to the Caster. When a range of IPs is used in a report, the first IP in the range is given as a similar link, and from the geo-location report the reader can click to other IPs that have been seen using the links at the top of the report page.
The dialog also provides a means to add two optional textual notes. First; the mountPt name that was involved. And second; a short text note about the rationale or cause for the blockage. This content s completed automatically by the SNIP IP blocking logic for most temporary blocked IPs. But you can now also add it for permanent or exempt entries. This has value to help the SNIP operator recall why an IP was added in the future.
The Dialog
The basic IP Entry dialog appears below. Not all of the sections shown below are displayed in every use case (sections that are not required are hidden).

The controls
Next we review the various controls in the dialog. As found on most SNIP dialogs, the small “i” icon in the upper right side brings up a contextual help page in the document viewer (this page).
Using the dialog consists of selecting which type of IP to enter (a single IP or a range) and then entering it. As values are entered the status label (here shown with the text Please enter the IP value) will change with helpful hints and warnings about the validity of the entered data or possible conflicts with other existing values. If the value is valid, the OK button is enabled.
The Single IP Value Group
The dialog defaults to this mode as single IP values are the most frequently used. The four bytes of the IP are entered as individual spin boxes. The small button P (for paste) can be used to easily transfer a IP as a string from the clipboard to the spin boxes. The logic will extract a the first valid IP it finds in the clipboard text. Any problem with the IP (such as a conflict with an existing IP) are shown in the status line below.
Hint: Select and copy the source IP with your mouse from the console or a report and then use the P button for rapid IP entry.
The Range of IP Values Group
This mode must be selected before use by checking the group box. Entering the starting and ending values follows the same process and rules as for the single IP value. The ending IP is expected to be larger than the starting IP. And the covered range is inclusive of these two values. So a range like:
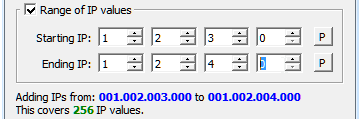
Will also block the IP value 1.2.4.0, not just 1.2.3.0 to 1.2.3.255
The status label
This label up updated as the data is entered to show any problems detected, such as conflicting IP ranges. The problem must be corrected before the dialog can be saved.
The Optional Text Sections
Here you can (optionally) enter a valid MountPt about the IP (using only valid MountPt characters, so a space is not allowed).
Here you can also (optionally) enter a short note about the IP. When SNIP does this it may also use html markup which is then not displayed but which is present in the actual text. This is useful for various reports.
The Ban / Block time period Group
This section allows entering the ban / block period of time, or making the entry a permanent one. It is not shown for exempt entries. The values in the combo box range from 5 minutes to 4 weeks in duration. The default value to use will follow whatever value you have setup in the General IP blocking dialog.
OK / Cancel Buttons
These perform the expected actions. Pressing OK adds the current value to the owning list. If the dialog was editing a prior value, the contents are updated. If not, the contents are added to the list. Pressing Cancel exits the dialog without change or saving anything. [When needed, Items can be removed from the dialog that displays the list in question, either IP banned list or the Exempt IPs.]
Hint
You can also access this dialog directly with the menu command:
SetUp ⇒ IP Ban/Block Settings ⇒ Bock and IP…