This article covers how to set IP values for an AWS virtual machine (VM) deployments as well as what firewall rules are needed for your SNIP NTRIP Caster to get and send data. While these instructions are for Amazon Web Services (AWS) machines, the process is very similar for other VM vendors
Background
It is very common to host a SNIP NTRIP Caster on a leased virtual machine (VM). This is an easy way to place your network on the public internet and to obtain a static IP so others (your end users) can find your Caster. This configuration, once set up, is very reliable and inexpensive (~$60/mth). For many businesses it is a preferable (and cost effective) over additional monthly fees for a static IP from their local ISP vendor. Some larger firms select a VM deployment over an in-house one simply because their IT staff does not want to open a port to outside users.
AWS offer a large number of host machine configurations to select from, as well as dozens of world-wide regional deployment locations where the actual hardware will reside. Simply select a region near your base of users. [Aside: The additional small latency which a more distant region causes is typically of little concern in NTRIP operations. And RTCM messages are time tagged to overcome this.] Select any instance type that has has least two cores and 4G of memory. SNIP has been optimized to use 2 or more cores. Do not select the single core instances that “sleep” when there is no processing to be done. Such a machine is of no value for NTRIP where the data is arriving on a 24×7 basis every second. See this article for further details on minimum system requirements. Consider also creating an “Elastic IP” so that the assigned IP value you are given will not change if the machine instance is ever restarted.
In general, you will want to select a “t2.medium” instance to run. This provides an AMD64 architecture with 4GB of memory and more than enough network performance to support thousands of users. If your concurrent connected bases will exceed 500+ devices, you may want to upgrade to a “t2.large” instance for the additional memory it provides.
The size of the machine you select (and hence the monthly cost) will also depend on what other services you run on the host machine. If, for example, you will run a WordPress web site on the same machine, you many need to increase the machine size to accommodate this.
The account you create with AWS to control your host machine(s) is in no way shared with SNIP or our support staff. If we need to assist you with technical support, we can simply watch your machine using Teamviewer when you allow us to do so. Protect your account details, as well as the PEM file you are given with the initial passwords.
The IP settings dialog
The host machine that SNIP resides on has no understanding of the internet nor how to reach it. Nor does it know how other machines reach it (what IP or URL they used). The IP Settings Dialog is used to set these values, mapping the values entered to hyperlinks in various reports that SNIP creates and sends to others.

In an AWS deployment environment, you must enter both the “public” IP of the host machine in the below dialog (click to enlarge), as well as the actual machine IP of the network card that the host sees. You may also wish to enter a URL name string if you have registered this IP with a DNS (Domain Name Server). Press the IP map button to open this dialog. [Aside: You must also open the correct firewall posts on both the host machine and in the AWS control panel. This is covered in the next steps. This is similar to the process used with a home-based deployment; you must open ports on the host machine and also on the DSL router device provided by your ISP. And the port forwarding must route the traffic to the port that SNIP is listening on at the host machine. ]
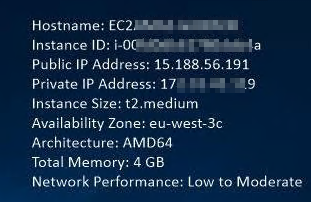
The background image of the AWS desktop will display the key values you need in the upper right corner. These can also be found listed in the EC2 Management Console (the dashboard) for each instance. Here is a screen image for the above machine.
WARNING: Do not set the machine IP value to be “127.0.0.1” (LOCALHOST). This simply will not work and SNIP will not receive any connections. Use the actual host machine value.
Set these values to match your own machine and save. If you have created a DNS entry for this IP on a domain, enter that as well.
Debugging Advice: When you toggle between the Connect and Disconnect buttons, you will see the text “Listening” and “Offline” displayed. If you press Connect and do not see Listening, then SNIP was unable to take control of the indicated network IP and port. The console log will display error messages about this, the most common case being an incorrectly typed entry. When SNIP is displaying Listening, then you will see any connection events in the console log [Set the log threshold to “Minor” and check the box marked Show Protocol Details. See also this article.] No console entries indicates no one is managing to connect, which in turn suggests a firewall issue needs to be resolved.
Before any connection can occur, we must ensure that two different firewalls are set to allow in-bound connections; this is covered next.
The Host machine firewall
Your AWS instance contains a firewall, which (like most firewalls) defaults to not allowing inbound traffic. You must add a new “rule” that tells the firewall to allow such traffic. You can add this rule in several ways, and you can also limit its application to specific programs. Here we simply open port 2101 (use whatever port you will have SNIP listen on) for TCP style traffic. [Aside: NTRIP uses TCP style packets and not UDP for its traffic]
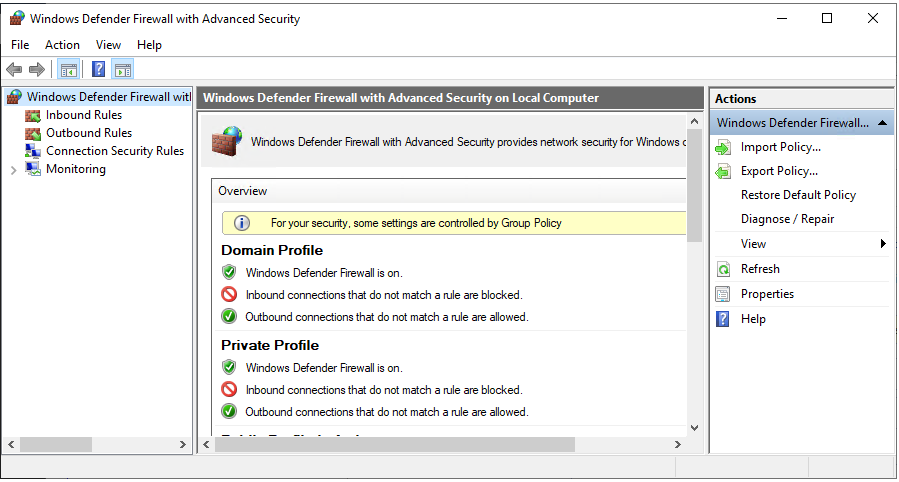
Proceed as follows. Log on to the host machine desktop, press the windows “start” button and type “Firewall” – select the program Windows Defender Firewall. Press the Advanced setting button (along the left side, bottom) to get to the actual program. You will see a dialog similar to the below.
Press “Inbound Rules” found in the left hand column tree-view and the display will change to list the existing rules as shown below. [In the below image the SNIP NTRIP rules have already been added, on your own machine other rules will be shown. ] The default setup has several dozen pre-configured rules. The presence of a green check mark indicates that a rule is activated.
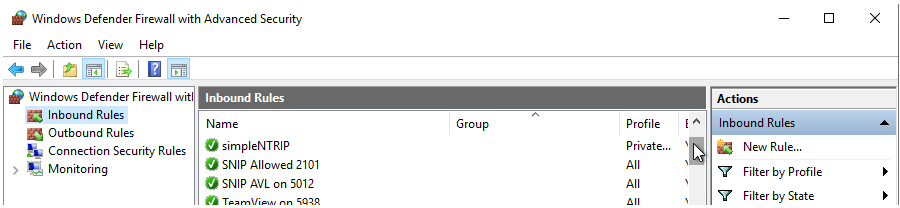
We must add a new rule for in-bound TCP traffic to support NTRIP. Press the “New Rule…” button found at the right side under Actions. This bring up a multiple step dialog guide you over completing the rule.
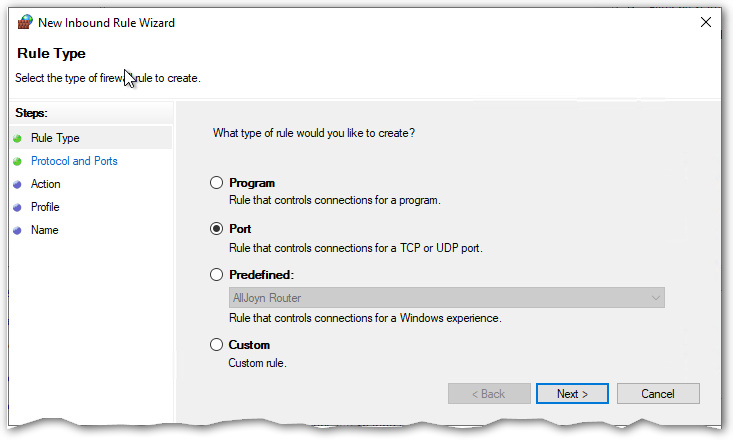
The first step is what the basic type of rule will be, select Port and click next…
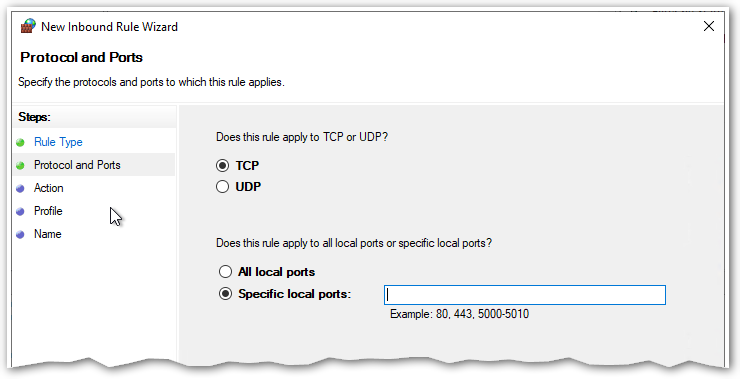
The next step specifies what protocol and ports are involved. Select TCP and enter the port SNIP will be a listener on (typically 2101), and press next…
Aside: If you will be using SNIP as an AVL server, enter that port here as well (typically 5012). If you will be using Raw TCP/IP connections, enter those ports as well (typically 3000~3010). You can also enter these as individual rules if desired.
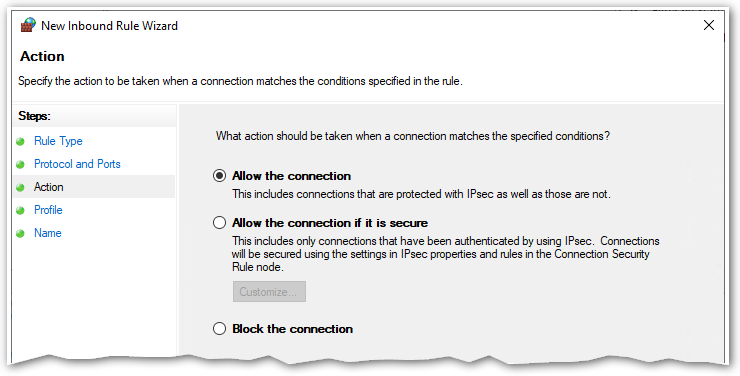
The next step specifies what action is to be taken when there is traffic on the indicated port(s). Set the radio button for Allow the Connection and press next…

The next step specifies where to apply the rule. Check all the buttons shown (as you want to rule applied for all connections) and press next…
The final step specifies what name the rule is to be given (and an optional description). You can enter anything you like here but we suggest “SNIP NTRIP Allowed 2101” or something similar. Press finish when done. The new rule is effective immediately.
The AWS firewall
In addition to the host machine firewall the AWS environment provides another firewall we must open to allow in-bound traffic. This is done using the AWS EC Dashboard panel to configure the security settings to be used.
Proceed as follows. Log on to your AWS account and the AWS EC Dashboard. The top part of the display shows all your instances. You will have one entry here for each machine you have configured in the current region. You may need to change regions (menu at the very top along right side) to see the machine you want. Once you find the instance, select it with the blue check box along to left side. This causes the tabs with the “description” detail in the lower half of the page to be updated to this machine.
When you created the host machine instance you assigned it to a “security group” which we will now edit. The name of the security group was whatever you selected, but a default name like xxx-launch-wizard-1 is common. You can find the security group shown (as a hyperlink) in the table in the upper section (if you scroll right) or in the lower section (in the section called ‘security groups’). In any event, click that to bring up the set of rules being used. You will again see a double layout style display with the sets of security groups (perhaps only one) at the top and a set of tabs below. Select the tab marked “Inbound rules” to see the existing rules associated with this group.
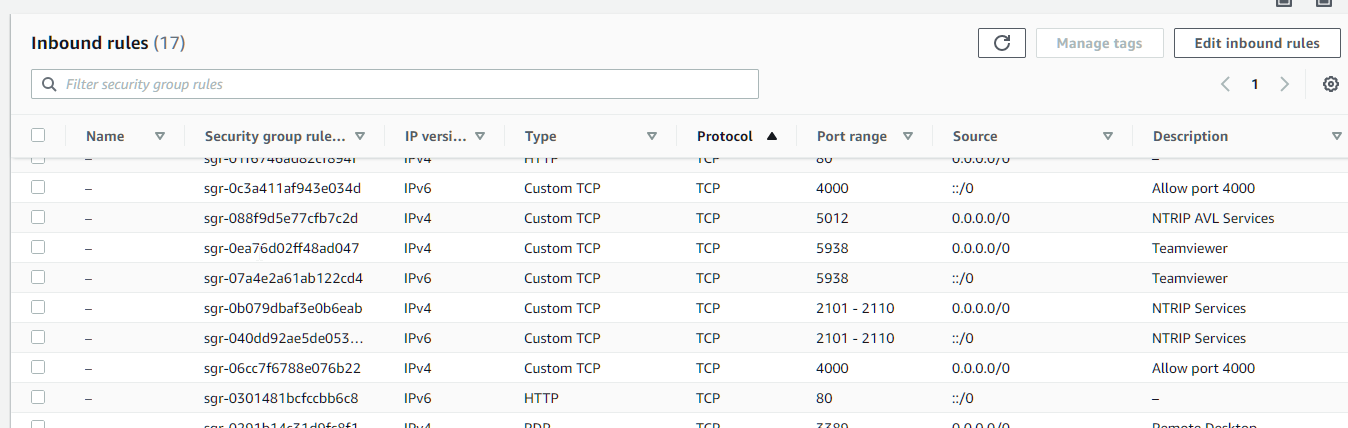
Your display will look something like this now. [In the below image the SNIP NTRIP rules have already been added, on your own machine other rules will be shown. (And the IP6 rule shown in not in fact needed)]
Press the button marked Edit inbound rules (upper right corner) and you will be presented with a more readable table of this same data which you can edit when needed. At the very bottom of the page you will now see the button Add rule. Press this and a new “empty” rule will appear which you can edit.
![]()
Fill out the entries as shown below.

Press Save Rules at the very bottom of the page. AWS will assign a unique rule number to the rule and validate it. The new rule is effective after a short delay (perhaps a minute).
Your Caster should now receive and reply to any traffic from others on the public internet.
How can I test it?
Use our monitoring tool at http://monitor.use-snip.com/ to check. Enter either the DNS name or the IP you entered above, and the public port. If your NTRIP Caster can be reached from the public internet, this tool will report on the Caster table it sends back. If it is unable to find a table (after a time out period it reports an error) then your Caster is not yet visible to others outside of your local environment.