Theis article provides step-by-step instructions to connect any modern Trimble base station to an SNIP NTRIP Caster such as RTK2go.com. While this article used a Trimble Net R9 GNSS device and was written to support RTK2go.com users with Push-In reservations, the general information and process is applicable to many other Trimble models, and any NTRIP Caster.
Logging In
Below is the initial log in screen you will see for the GNSS base station. You need to have an account on the GNSS device itself to do this and must be able to reach it’s IP from the browser that you use.
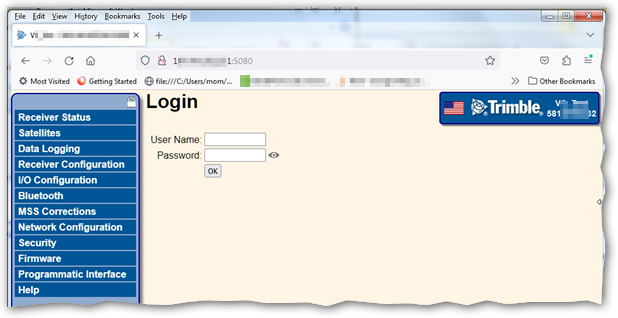
After a successful log in the page will briefly say “OK” and then move to a page that summarizes the current satellite (often called SV, for space vehicle) tracking activity on the GNSS unit
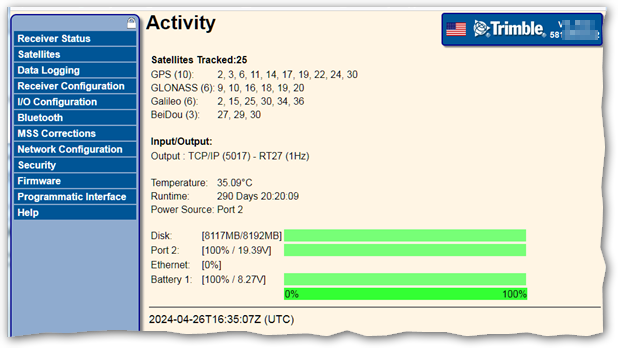
Aside: If this device already had an active NTRIP connection to a Caster, you would also see a line (typically with the text: “Output : IBSS/NTRIP Server – RTCM_V3”) present in the Input/Output: section above.
We are interested in setting up an “NTRIP Server” connection, which Trimble has placed under the “I/O Configuration” tab along the left side. Press that and you will be taken to another page similar to the below
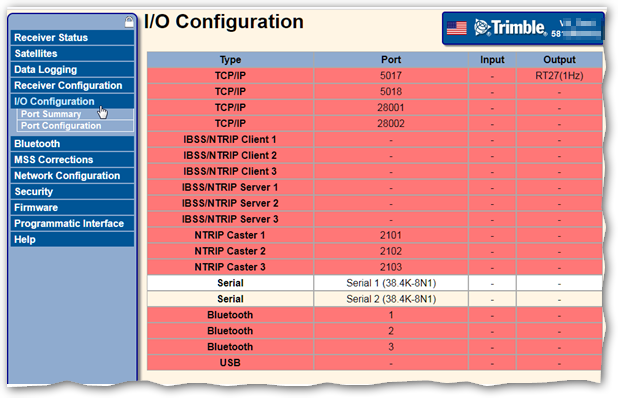 The device supports up to 19 different output streams in various common formats. Each has its own setup page with appropriate options. Most of the streams allow selecting one of several standardized output formats (this is where you will tell it to send RTCM messages). On this page the color red means “off” (or no-used if you prefer), green means a stream is on and active, and yellow means some problem has occurred or the stream is in a transitory condition (such as retrying).
In the image above you can see that port 5017 is setup to send RT27 (a Trimble proprietary message format) over TCP/IP but the stream is not active at this time (indicated by red). The other choices are all off as well.
We are interested in the three lines called “IBSS/NTRIP Server1” (and 2 and 3). These are the connections used to Push-Out data from the GNSS base into the NTRIP Caster you designate. [Aside: IBSS is a Trimble invented term we can ignore]
Aside: Note that this device can in fact be a “baby Caster” serving just its own base station to up to ten NTRIP Clients. However a publicly accessible (typical static) IP is required for this. Your motivation to use RTK2go may be simply to forward the base station to a publicly available Caster so others can access it.
Please press the line (it is in fact an html button) marked IBSS/NTRIP Server1 and you will be taken to the I/O setup page, shown below. If stream #1 is already in use (perhaps this base is sending to data to another NTRIP Caster as well), simply select one of the other two lines and use that.
Side note: Observe that each page starts with a combo drop-down
where you can easily move to another stream if desired.
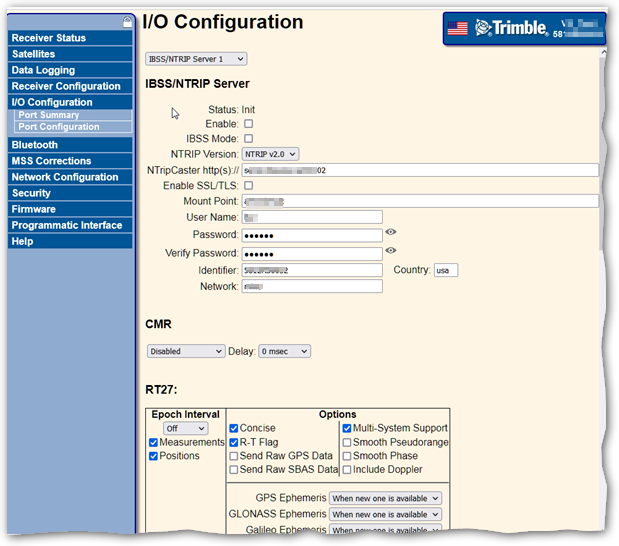
This is the critical page where you will enter two key things:
- The reservation details you have received from the RTK2go registration process or from the Caster operator if you are connecting to another Caster.
- What sort of data will be sent over that connection to the remote caster. Typically this will be RTCM3 messages (or perhaps the older CMR+ format used by Trimble).
The rest of this page is not of any interest to us today and can be ignored. This includes the sections marked RT27, OmniStar, and BINEX and CMR (unless you plan to send that).
Taking each of the two sections in turn…
Caster Setup
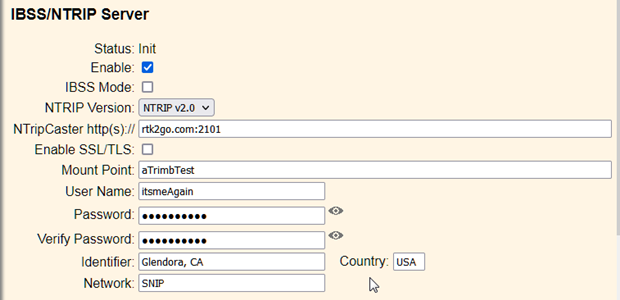
We now setup the connection to the RTK2go Caster. Look at the registration confirmation email you received and find the section similar to the below. You will of course enter you own details rather than this example.
Sir or Madam: The requested mountPt has been added to the
SNIP NTRIP Caster operating at rtk2go.com:2101 and may now be used.
The mountPt name is: aTrimbTest – (this is case sensitive and must match to be used)
With the user account: itsmeAgain – (also case sensitive)
With the password: iforgotit – (also case sensitive)
Other details [City: Glendora, CA, Country: United States of America Code: USA]
This connection is expected to use the NTRIP Rev2 format (contact us if Rev1 is preferred)
The key section of the unused dialog appears below. Note that this device defaults to using NTRIP Rev2 (rather than Rev1 which many inexpensive and/or open source based devices use). If you requested a Rev1 reservation, no problem, you can set it up that way as well. But, for a base station, you MUST use the reservation format you were assigned. Note that the line for “Status” is “Init” at this point. If there are errors in the setup or connection, they will be summarized (rather poorly) on that line.
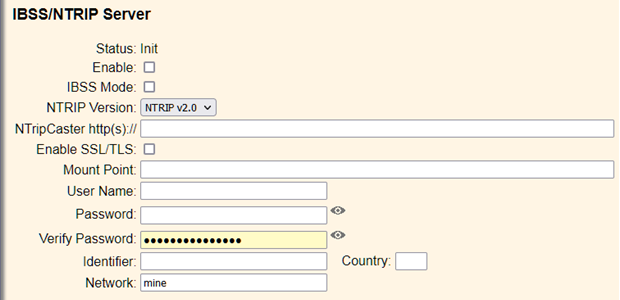
Enter the above registration data so the dialog now looks like the below. Use the City name as the “Identifier” or leave it blank (Trimble will default to using a product name and serial number here). You can enter the 3-digit country code or leave it blank, but the SNIP Caster will fill it in for you based on the IP which the base connects from. You can leave the “Network” blank as well, the SNIP Caster will fill it in as well.
Be sure to check the “Enable” button. Do not check the “IBSS” mode button. Do not check the SSL/TLS button.
If you requested a Rev1 reservation by mistake: Chose “NTRIP v1.0” in the combo drop-down for NTRIP Version. All other values remain the same, and the SSL option is hidden. There is no user name in a Rev1 style connection, although this field remains visible in the dialog, just leave it blank.
We have to save these changes (the OK button at the bottom of the page), but first we need to set the message contents to be sent.
Setup Details for using your own copy of SNIP
This article was written for those sending data directly to www.RTK2go.com from the Trimble base. Typically this is so that your rover devices can then access it in the field from a public IP rather then the private office network your Trimble device is at. Here are two further variations: If you are sending the data to your own copy of SNIP somewhere else (such as a VM you leased from Amazon Web Services), replaces the line “rtk2go.com:2101” with your own IP and port. If you have the Trimble base connected to a local copy of SNIP running in your office (and can not open local firewalls to allow others to get to it), use the Push-Out tab to forward the data to RTK2go using the same reservation credentials.
Message Setup
For the most users, you will send only RTCM3 messages. You will want to send either older legacy messages or the newer “MSM” messages. You set that in the below section (which happens to default to the even older RTCM 2.2 message format when it is first displayed). All other message types shown on this page should be set of off or disabled. Technically speaking, more than one message type can be sent over the same stream in NTRIP but as the rover devices cannot then decode and extract the individual messages they need, this has no practical use.

First, in the Version combo box… Select the RTCM3 message (rather than RTCM2.x messages) and the display will change to be one of the two formats shown below.
- To send older legacy messages (GPS MT1004, GLO MT1012, etc.) select “3.X” in the Version drop down. You would want to do this if your rover devices cannot process the newer MSM messages. [Aside: SNIP’s PFAT functions can translate MSM messages down to legacy messages if needed, see this link for details.][spacer height=”10px” id=”2″]
- To send the newer MSM messages (GPS MT107x, GLO MT108x, and other GNSS constellations) select “3.2” in the Version drop down.[spacer height=”10px” id=”2″]
- If in doubt, select “3.2” in the Version drop down.[spacer height=”10px” id=”2″]
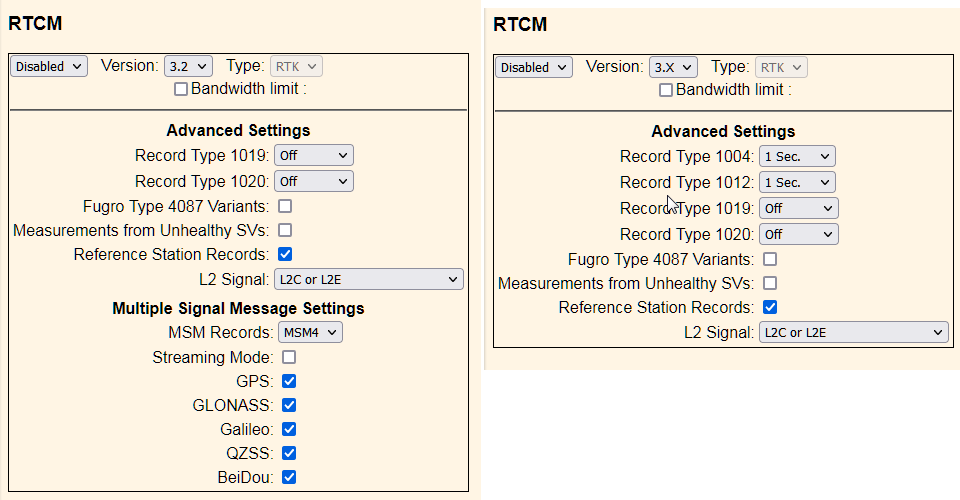
In both of these dialogs we are given the option to send the broadcast orbital information messages (MT1019 and MT1020) which we set to always be Off. The rover devices already have this data and its presence adds unwanted bandwidth.
Set the Fugro Type 4087 Variants to be Off. Set Measurements from Unhealthy SVs to be Off. Set Reference Station Records to be On.
If sending Legacy messages, set the sending rates for MT1004 and Mt1012 to be 1 Sec. There is no reason to ever use another sending rate, but if you ever did, be sure both constellations use the same rate.
If sending MSM messages, you must select which specific MSM message to use (it will be sent at a 1 sec rate). Select from either: MSM4, MSM5, MSM6 or MSM7. Do NOT select MSM3, MSM2, or MSM1 as these are not supported or decoded by most devices and in fact provide little useful data (they were included in the std for completeness but are of almost no value). At this time MSM4 is the most popular choice, but MSM5 contains some Doppler information that is very valuable for multipath detection in rapidly moving rover devices (read: automobiles), so select that if it fits your application needs. MSM6 and 7 provide some additional bits of measurement precision which may provide more accuracy to some rover devices. If in doubt, use MSM4 or MSM5.
Finally be sure to select Enabled in the drop down at the very top left side of this section to turn this message format on for this stream.
Debugging
At this point you have completed the dialog, so press OK at the bottom of the page to save the settings.
You will briefly see a page that says “Ok” and then will be returned to the I/O Configuration page.
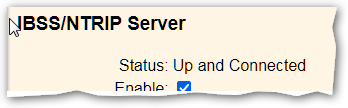
If the line you were working on is now green, the connection has been successfully made and is now working. Congratulations. You can further confirm this by looking for your mountPt to appear in the RTK2go Caster status table, http://www.rtk2go.com:2101/SNIP::STATUS or by using a rover device to connect to it.
If the line you were working on is now yellow, the connection has encountered a problem. Click on the button again and pay close attention to the very first “status” line there.
This is what you will see when it is all working correctly:
But if you are reading this far you more likely see this:
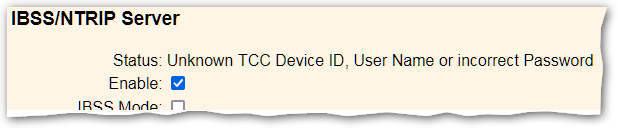
Pay very close attention to the text you entered. Make sure there are no leading or trailing spaces anywhere. If you use cut and paste be VERY careful that an extra trailing final space is has not been added to text and passwords. Make sure the spelling and capitalization precisely matches your reservation. Only use ASCII characters, no diacritical marks are allowed. Correct any problem entries, and press OK to save and try again.
When needed, you can get technical support at our normal support email (support at use-snip.com), please be sure to tell us the mountPt name and (if possible) the IP you are connecting from so we can better assist you.
That’s it!
Misc Remarks
But its all still red… This means you did to enable either the NTRIP sending or the RTCM message sending, or both. Both of those need to be set. It is a check box for the “IBSS/NTRIP Server” section and a drop-down in the “RTCM” section.
I want to send as a secure SSL/TLS connection… Just check the box in the “IBSS/NTRIP Server” section marked “Enable SSL/TLS” and you are set. But also make sure you use the correct port for the Caster. Most Caster uses 2101 for the “plain” (unsecured) connection and another for the secure ones. There is no official preferred port and the Caster deployment can chose any they wish. On RTK2go.com the secure port is port 2102 but this feature on this Caster is still being used for testing and may not be enabled when you try it. [Plus we are using both good and bad CERTs to allow developers to experience a range of replies, bad CERTs are typical rejected and not used] If there is a problem with the SSL connection, you will see the status line state: SSL service not found.
I need to use Rev1 not Rev2…. Enter your data as for Rev2, then simply select the value “NTRIP V1.0” in the NTRIP Version drop-down of the “IBSS/NTRIP Server” section. You do not need to change anythings else. FYI, Rev X and Version X mean the same thing in this context.
Aside: On the Trimble unique term IBSS, Internet Base Station Service (IBSS) – this is not that same thing as the internet term IBSS (Introduction of Independent Basic Service Set) which is a type of an ad hoc mode for peer to peer network connections.
We would like to acknowledge the use of the Net R9 used here
provided by Vantage-South (https://vantage-south.com/).
If you have a need for RTK corrections in Alabama, Mississippi, Central Tennessee,
and NW Florida please consider using their services.