In this article we consider the general approach to detecting and blocking (banning) repeated connections coming from unwanted users. When such bad connections repeat constantly for hours on end, they become a problem and must be dealt with. In a broad sense these connections fall into two categories:
- Your legitimate users who have simply mis-configured their NTRIP Client devices.
- Unknown and unauthorized users who are probing your Caster with curiosity or ill-intent.
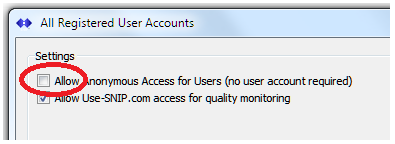
As a first line of defense, make sure your Caster is set to accept connections only from users with preexisting accounts rather than being open for anyone to connect. This is controlled by the Manage User Accounts dialog (which is reached with the menu command Setup ⇒ Manage Users Accounts…) Ensure the check box “Allow Anonymous Access” is unchecked. While you can run your Caster in an Open mode (no user account required), this makes it more vulnerable to attacks.
Then, assign any missing but needed User Accounts so that every valid user is registered with the Caster, and ensure they use the provided credentials.
If the problem connection is coming from one of your legitimate users, the next step is typically to contact that user and work out the issues. It is fairly common for a user to enter incorrect settings and then leave the NTRIP Client device on for many hours.
If the connection is unknown and unauthorized, it presents greater challenges and most of the remainder of this article is devoted to managing that issue.
We next consider the various tools SNIP and the Host Windows machine provide to block such connections for varying periods of time. We then review the general process to detect and track such abuses.
Lines of Defense
Once your Caster is closed (so a user account is required), there are three primary lines of defense used to block unwanted connections; each is considered further in turn.
- The threshold setting in the IP Ban Settings dialog
- Manually Blocking an IP at the Caster (for a temporary period or permanently)
- Blocking on the Host machine using the Windows Firewall
For the most part, legitimate users are well handled by the first point. In the event of multiple bad connection attempts (greater than the threshold levels you have set in the below dialog), such users are banned for a fairly short period of time you have set. If your Caster has the eMail Plug-In, the SNIP operator will receive an eMail alerting them when a user is blocked (as well as the reason for the block).
The threshold setting in the IP Ban Settings dialog
The use of these settings is described further here and here. Access this dialog with the menu command SetUp ⇒ IP Ban Settings… You will see the below dialog.
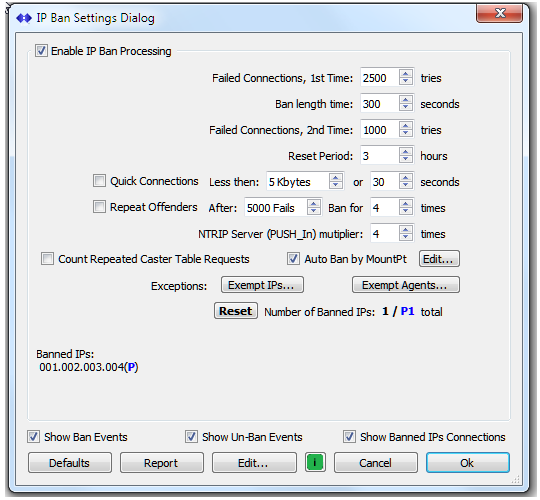
The key point to be observed is that the various controls shown on the upper section of the dialog allow you to set the thresholds for various events that will result in a temporary ban for the offending source IP.
The ban time is set with the 2nd control (“Ban length time” – here set for 300 seconds, or 5 minutes). You will typically want to set this in a range of no more than a few hours. When you edit a banned entry, a drop–down combo allows selecting much longer time periods. These can span up to 4 weeks in length. This is usually only required for “problem” cases. You can also make any IP ban permanent in that dialog. This is discussed further in the next section.
The three buttons deserve further discussion.
Ban by MountPt; Enable the “Auto Ban by MountPt” checkbox whenever a problem base station or user is connecting to a specific mountPt using multiple IPs in a small subset. Press “Edit” and enter the mountPt name in the list of prohibited mountPt names. If the connection attempt comes only from a single IP, there is no need to use this method.
The Exempt IPs… button is used to create a list of IPs which you NEVER want to have banned. Such IPs are typically trusted devices used to monitor aspects of the Caster For example, you might have a 3rd party monitoring service that is checking the caster or a specific mountPt in the caster. [Aside: Tracking and reporting any base station that has gone offline is much better handled by the NTRIP Server Warnings which are part of the automatic eMail reports; see this article for more details.]
The Exempt Agents… button does that same thing for known agents string. Use this button (rather than Exempt IPs…) if a trusted devices may connect from multiple IPs.
Manually Blocking an IP at the Caster
(for a temporary period or permanently)
When an IP is blocked, it is listed in the lower section of the above dialog. You can also examine the current list by pressing the Edit button. This brings up a display of the currently blocked IPs. The radio buttons can be used to show/hide the temporary or permanent blocked IPs in the display.
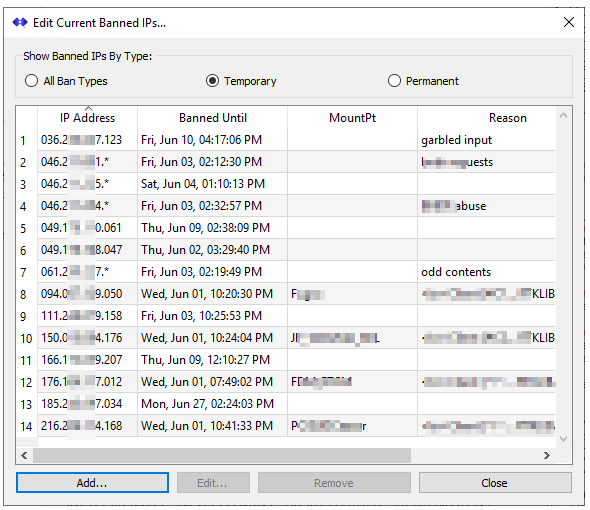
In the Edit dialog you can extend the ban period for any entry by selecting it and then selecting a longer time period. You can also use the Add… button to create a new entry. And the Remove button deletes the selected entry. Both Add and Edit bring up the below dialog.
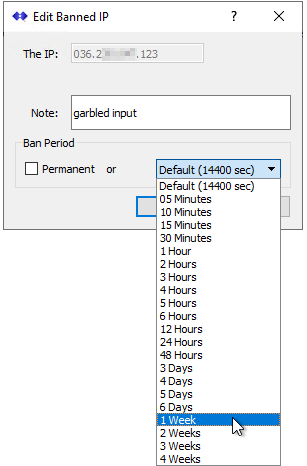
If you check the box for Permanent then the IP will never be removed from the blocked list. Do this only when you have an IP which you will never allow to connect to your Caster.
Use the “Note:” section to (optionally) add a short textual message regarding why this IP was blocked. This will be of value to you when you next look at the IP. Some customer report settings can allow other parties to see this text, so politeness should be considered to avoid embarrassment.
The blocked IP entry also allows for the use for a subrange for the lower byte, using the “*” character. An entry like “1.2.3.*” will block every IP between the ranges of 1.2.3.0 to 1.2.3.255 This has great value if the problem connection comes from a limited range of IPs that often changes.
Adding an IP manually (or editing an existing one to persist for longer period of time) is your primary defense for problem connections that are not sufficiently handled by the automatic logic above. It is not uncommon to block such connections for several days or more at a time on the presumption that the device owner will notice that their connections are blocked and correct things.
Aside: If you have the eMail Plug-In and the Enhanced User Management (EUM) Plug-In, then the owner of the user account can be automatically emailed when the offending device is first blocked. The email (which is CCed to the Caster operator as well) contains a summary of the error cause. This is often enough to resolve the problem without further technical support.
When a customer informs you that they have corrected the issue or requests that an IP block be removed, bring up the above dialog, select that IP, and press Remove to clear it.
Blocking on the Host machine using the Windows Firewall
Whenever SNIP has blocked an IP, that IP can still establish a connection to SNIP (or to any other open port on the host machine). In the SNIP process flow, new connections are checked against the blocked list and if found are then promptly disconnected. This requires a small amount of processing effort which can be noticeable in very heavily loaded Casters.
Another way to block such connection is the use the firewall logic on the host machine that is running SNIP. An IP blocked at the host firewall will never connect to SNIP and is discarded without ever interacting with the SNIP application. As a result; such IPs do not leave any traces in the connection logs.
On a Windows server host this is called the Windows Defender Firewall; on Windows 7 machines it is called Windows Firewall, changing the name for Windows 8 and 10. The interface details vary in small ways. You will want to make changes with the Advanced Settings, in the section called Inbound Rules. Here you can add multiple IPs (or ranges of IPs) to be blocked.
Adding a new IP involves three dialog box, shown below. From the advanced settings, proceed as follows. Create an inbound “port” rule for port 2101 (or whatever port your Caster uses). This will be set to “block” any “TCP/IP” type connection from the IPs you enter. We suggest you name this rule “Block InBound SNIP Connections.” You then use the “Scope” tab to enter and review the remote IP addresses you wish to block. If you press the “Add” button the dialog in the foreground below is displayed. You can enter either a single IP or a range of IPs here. If you enter an ill-formed one or a duplicate, the dialog will not accept it and will warn you.
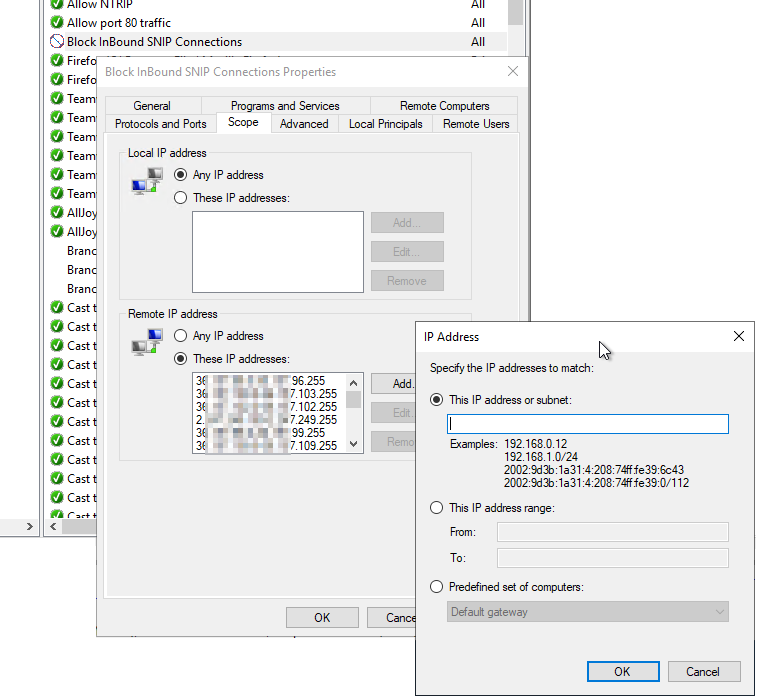
This is basically the opposite action of the in-bound rule you may have created when you first set up SNIP to ALLOW traffic on port 2101 to reach your Caster. [An example of doing this can be found in this article on AWS firewall setups.]
Blocking an IP at the host machine firewall should be considered a drastic and final step to take for devices that repeatedly attempt to connect over a long periods of time. It would generally be unusual to take this step for a known customer who could be contacted offline and the problem resolved.
Detecting and Watching Bad Connections
How do you monitor or observe bad connections?
There are several ways including using the console log, the events view, looking at various IP reports, and watching live user connection attempts using the Connected Users dialog.
The Console Log
Well, the first place to look in real time is the console log itself. There you will see any connection as they occur in real time. If you set the console log to be “Minor” (mid-screen combo button) and check the box marked “Show Protocol Details” (found in the Caster and Clients tab) – then you will see the details of the connection as well as the way the connection was handled. Use the Pause button (mid-screen right side) to stop the console from scrolling when there are many entries occurring.

The Event View
The “Major Events” view along the right side also provides a quick color-highlighted summary of good/bad connections for both Base Stations and User Connections. [This is a Pro model feature only; enable its display with the Show Sums check box] You can easily see repeating connection problems over short time spans this way. See this article for further details.
An IP Report
To get a summary of recent Blocked IPs (both active and those in the past) a report can be used. The Network Traffic reports are useful for this (menu: Reports ⇒ Network Traffic then select the desired report).
The IP_Ban_Report report provides a summary of current and past Blocked IPs. It often provides both the MountPt involved and the reason for the block. This report also provides a prior history of the past ~100 blocked IPs which is useful when checking for problems that have occurred over the past few days. An example report (without user identities and supporting report links removed) can be found here (to be provided).
Watching live User Connections
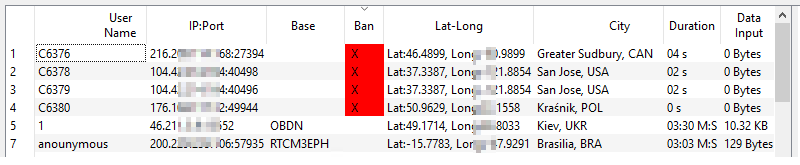
Bad connections from any IPs which are currently being blocked can also be easily tracked using the Connected Users dialog (open with the menu command SetUp ⇒ Display Current Users). You can sort the columns to see who is connecting. Click on the header in either the BAN column or the Duration column so that the display is sorted by this value. Press Pause to stop updating the display when one of more banned entries are shown you wish to examine. [Note: Any IPs blocked by the host firewall will not be displayed here because they never reach the SNIP application.]
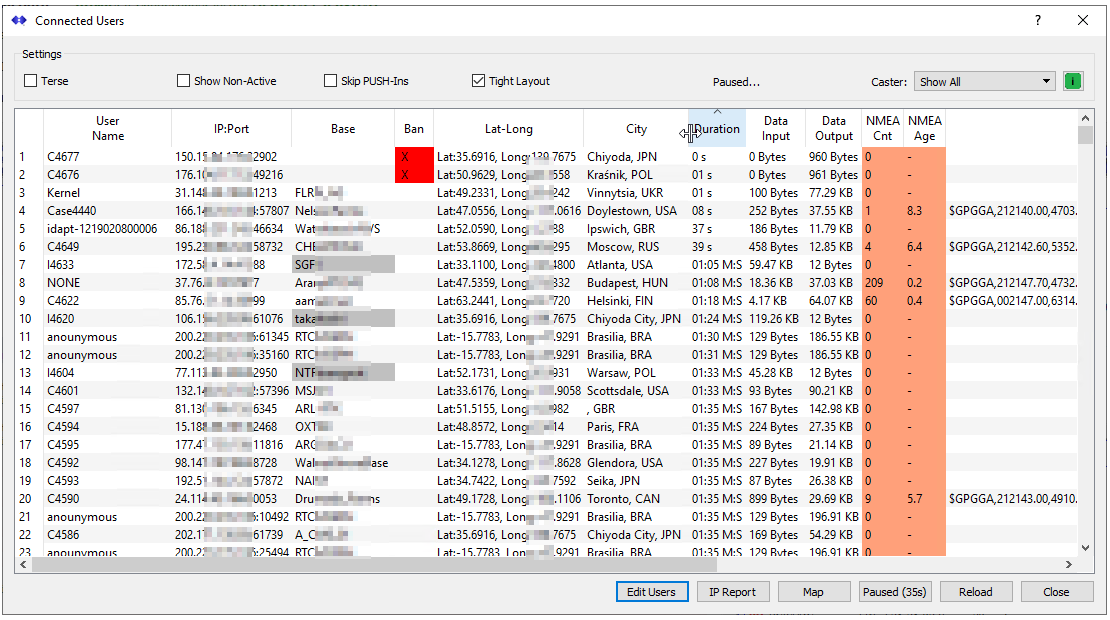
In the above we see two block IPs attempting to connect, one coming from Japan, the other from Poland (this caster handles international users). If the reported City seems odd it may indicate a remote connection that should not occur. Or it may indicate a nearby cellular phone user (Cellular networks do not maintain their reverse Geo IP mappings very well). The reported countries are generally quite accurate. Be sure to Pause the display updates when examining the entries. Recall that hovering the mouse over the User Account, the IP, or the Base Station will bring up more details about that connection.
In cases of jamming (hostile or inadvertent) you may see the same IP connection multiple times. This indicates it reconnected very quickly (which a correctly designed NTRIP device will not do). In the case of non-NTRIP devices the connection may not request a suitable mountPt. Alternately, NTRIP devices may request a mountPt that is not present on the caster, including ones that have never been present on the Caster. If you see a large or recurring block of red “banned” entries, this indicates you should look at the failing connections to see if action should be taken.
You may want to increase the duration of the ban time for such connections as described in the prior section. In more extreme cases you might want to select a duration spanning multiple weeks. In truly extreme cases, you may decide to mark the ban as permanent. Beyond that, you can block the IP at the host firewall so it never reaches SNIP. These are all described in the preceding sections.