This article explains exporting and importing User Accounts in the SNIP Caster. Each process is considered in turn.
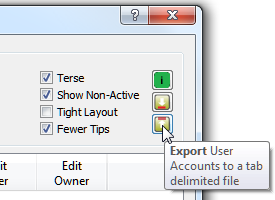
Exporting User Accounts
This is a simple one-step process. From the Manger User Accounts dialog (displayed with the menu command Setup ⇒ Manage User Accounts… ), press the Export User Accounts tool button at the far right of the dialog.
An export file is created from the current internal User Account file representation with all the details of every current user account. A summary of the action is also displayed in the console log. Note that the name used for the file is auto-generated and contains a date-time stamp in order to tell different exports apart.
[USRS]:   Exported 1 User Accounts, file is 4.63 KB long.
  File at: C:/Program Files (x86)/SNIP/bin/UserAccounts_2023_06_03_11_21_30.txt.
  You can edit this file and import it when done.
  Or you can import and merge another file to add users.
This is an ASCII only text file using a tab delimited output style. Each line ends with <CR><LF>. There is one row for every User Account. Each row has 49 columns of data to cover all the various user account restrictions that may be present. Most of these fields will be blank, and can be left empty (in most user accounts they are not used). As a rule, any empty field produces a safe “not used” result when imported. Only a few fields are required to be present, such as the User Account Name and password (and these are all documented in the header).
Comments and meta information are found on lines which start with “##” The first ~75 lines document the formats used and the meaning of each field. A trivial entry example is shown below for the user account ‘bob’ which has the password ‘none’ and which can connect up to 5 simultaneous times at once. There are no restrictions present on the account (and it has never connected).
UA042289 CA000000 bob P none 5 0 0 0 0 0 01-01-2000 00:00:00 01-01-2000 00:00:00 User-Active Off 02-06-2024 00:00:00 EndTimeMsec=1717311600000 Off timeP=0,timeU=0,autoRandE=0,emailOnAdd=1,emailOnPast=1,emailAt20=1,emailAt50=1,persistUntilD=0 Off regionType=circle,cirPtLat=0.0000,cirPtLon=0.0000,radius=25.000,rectN=0.0000,rectS=0.0000,rectE=0.0000,rectW=0.0000 Off UseCaseSens=1 Off NoNearPassThrough=0 Off Off End
It is possible to read this file with any text editor, we would recommend Notepad++ (see https://notepad-plus-plus.org/) which has several nice alignment features for tab formatted files. You can also read the text with Microsoft Excel (importing it as a tab separate file), but use caution that it does not damage your data with auto formatting (especially where dates and times are concerned).
Hint: The best way to understand the formatting used with the more complex restrictions is simply to create a User Account with that type of restriction and export it. The format used for those fields will then be obvious. In case of complex questions; please just contact us for support in the normal way. Keep in mind that SNIP, like most GNSS tools, uses UTC time internally (not the local time zone). And also that the order of dates and time is typically expressed as yyyy-mm-dd-hh-mm-ss.sss. So a date like July 1st 2023 would be 20230701.
The exported file can then be edited in various ways or used as a data source to drive other back-office processing scripts. In the export step some additional historical usage data items are also present to aid in creating offline reports (for example the last connection time, IP used, and mountPt used). That data is not read back in when/if the file is imported.
Aside: The backup process also makes a copy of the current User Account file when run. That file is in the format used internally by SNIP and is not easily edited by hand. Exporting translates various binary details into a textual format and produces a file that humans can edit.
Importing User Accounts
Importing User Accounts is a more complex process that involves two basic steps:
- A pre-import validation process to check the records, and
- The import itself using the options you have set to resolve any conflicts.
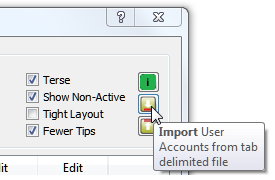
The import process is started as follows. From the Mange User Accounts dialog (displayed with the menu command Setup ⇒ Manage User Accounts… ), press the Import User Accounts tool button at the far right of the dialog.
A dialog is then presented where you can select the file to import the User Accounts from. We presume you have created this file beforehand. Import files do not need to have or use “##” for comment lines. But it can be convenient to start a “problem entry” with “##” when debugging an import file.
After this, an Import Setting dialog is presented (shown below) where you can control details of how the file will be processed.
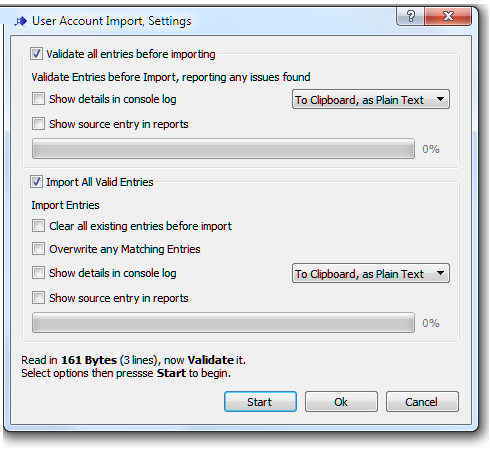
TIP: When testing a new import file it is generally best to UNcheck the group box marked ‘Import All Valid Entries” and run the Validation section (one or more times) to determine what, if any, errors may be in the source file – correcting them as you go. After you are satisfied with the results, then check the Import box and perform the actual import. The process is started by pressing the Start button.
General Remarks
Both sections can be enabled or disabled from running, although it is customary to disable the import step and run the validate step one or more times; correcting the source text as errors are reported. In each section there is a check box marked “Show details in console log” that, when enabled, will place any report errors or action into the log. A similar check box marked “Show source entry in reports” will, when checked, cause the current source user entry to also be placed in the logs. These reports number the target source file lines for reference. Each line of the source file line can be very long, so they may appear on the screen as word-wrapped and therefore harder to read (this depends on the word-wrap check box you have selected for the console controls). The combo button marked “To Clipboard, as Plain Text” or “To Clipboard, as html” can be used to place the entire report (in the selected format) on the clipboard for easy copy/paste into the editor of your choice. A progress bar is shown during the process, although for all but very large files (thousands of users) the entire process take only a few seconds unless one of the above check boxes is selected, which may result in many console log entries.
Validate Entries, Controls Settings
This section controls the pre-processing used to check entries. In general it should be enabled. When run (when “Start” is pressed) it will process the entire file. Many error types will result in the user entry (the row) being skipped, and the entry as the what was wrong placed into the log. A few error types will cause the entire file to be rejected, and the import step will not be processed (regardless of if checked or not). This typically occurs when a file is selected that is not a composed of User Accounts. Each User Account line is required to have the correct number of tab delimited entries, even when they are all empty (currently 49) and end with <CR><LF>. The report of errors contains extensive notes on what error(s) were found.
Import Entries, Control Settings
The actual step of importing the new User Entries has two important settings:
- A “Clear” checkbox that removes all existing entries before starting the process.
[The check box marked “Clear all existing entries before import”] - A “Overwrite” or Skip checkbox that controls how any entries that match an existing entry are handled.
[The check box marked “Overwrite any Matching Entries”]
These are used to control the import process, for example:
- If you wish to Replace all current entries with the new file,
DO check the clear box, the overwrite box can be checked or not. - If you wish to Add all current entries in the new file, keeping older entries,
DO NOT check the clear box, and do NOT check the overwrite box. Any new entries (user accounts that do not yet exist in the system) will be added. - If you wish to replace all current entries with the new file AND update those that may match existing entries,
DO NOT check the clear box, and DO check the overwrite box. Any new entries (user accounts that do not yet exist in the system) will be added. Any new entries that match with an existing entry will replace (overwrite) the existing entry.
The process is started by pressing the Start button. The result is shown in the console log (any on the clipboard). The number of User Account entries and also shown. The new/updated User Accounts will be used by the Caster immediately thereafter.