SNIP provides a number of dialogs to interact and edit User Accounts. This article briefly summarizes the major dialogs used to create, delete, edit, monitor, and review these accounts and the Customer Accounts you have created.
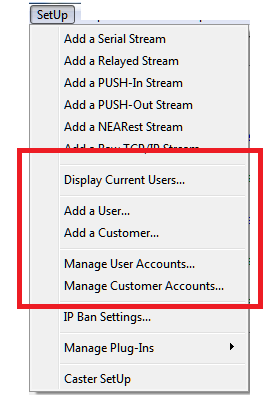
The SetUp menu provides a direct way to interact with your User Accounts and Customer Accounts (what is the difference between those two? – please see this article for an explanation).
Five menus are provided that will take you to different dialogs. Each is summarized in turn.
Display Current Users…
The menu brings up the Connected Users dialog which displays all currently active users (NTRIP Clients) connected to your SNIP NTRIP Caster.
Add a User…
The menu brings up the Creating (a) New User Account dialog which allows creating a new User Account (an NTRIP Client account). Once a new user account is created, it’s connection rights can be restricted in various ways using the same dialog (if the EUM Plug is present). Behind this dialog the All Registered User Accounts dialog is also displayed and any changes made will be reflected in that dialog as well.
Add a Customer…
The menu brings up the Edit a Customer dialog which allows creating a new Customer Account (these are the entries that ‘own’ the user accounts and provide the meta details such as the owner’s phone number or eMail address). Behind this dialog the Customer Account Details dialog is also displayed and any changes made will be reflected in that dialog as well. [Note: the “Enhanced User Management” Plug-In is required to create Customer Accounts.]
Manage User Accounts…
The menu brings up the All Registered User Accounts dialog which allows reviewing, editing, reporting and other management tasks on the collection of User Accounts.
In this dialog are many tool-tips which can quickly provide summary information about each entry when the mouse is hovered over an entry.
Manage Customer Accounts…
The menu brings up the Customer Account Details dialog which allows reviewing, editing, report and other management tasks on the collection of Customer Accounts.
In this dialog are many tool-tips which can quickly provide summary information about each entry when the mouse is hovered over an entry. [Note: the “Enhanced User Management” Plug-In is required to create Customer Accounts.]
Quick Tasks
Here are a few directions to quickly perform common tasks.
Add new user (NTRIP Client)
- Select the menu item Add a User, or from the All Registered User Accounts dialog press the Add User button.
- Provide a unique user name and password to be used, press the Ok button.
- All other setting are optional.
Extend a User’s connection period
- From the All Registered User Accounts dialog select the desired user account and press the Edit User button (or right click on the entry and select Edit from the pop-up menu).
- Select the tab marked Time Use Restrictions.
- To disable time limits entirely for this user, uncheck the box labeled Restrict user Connections…
- To edit or extend the time period for this user use the calendar and buttons.
- (Note that the EUM Plug is is required to use this feature)
See a user’s recent NMEA-183 $GGA sentences
- From the Connected Users dialog ensure that the Terse check box is unchecked.
- Resize the window so that data along to right-hand side is visible.
- The last $GGA sentence as well as the count of sentences and the age of the message is displayed.
- Hint: You can sort this table by clicking on the table headings.
- Hint: This table is updated every few seconds, it can be helpful to press the Pause button when reviewing the contents.
Disable a User
- From the All Registered User Accounts dialog select the desired user account and press the Edit User button (or right click on the entry and select Edit from the pop-up menu).
- The tab defaults to Basic Settings, to disable the user check the box marked Disabled.
- (Note that the EUM Plug is is required to use this feature)
Remove a User
- From the All Registered User Accounts dialog select the desired user account and press the Remove User button.
- A confirmation dialog asks if you wish to delete the selected user account, reply Yes. Caution: there is no UNDO ability.
Disconnect an Active User
- From the Connected Users dialog select the desired user.
- Right click on that entry and select Disconnect User.
Disconnect an Active Base Station
An active Base Station (regardless of the method it used to connect to the SNIP Caster) can be disconnected by:
- Go to the stream tab that the Base Station appears in (Push-In, Remote-Relay, etc.)
- Right click on that stream to bring up the context menu.
- Select Disconnect.