How to Set Up eMail Services
when the Plug-In is active
An optional SNIP Plug-In provides the ability to send eMails to your users or to yourself directly from the Caster. This article describes how to setup the service on your Caster.
Sending eMail is a convenient way to inform your users of various reports, graphs, and charts which you may wish to share with them. Whenever a user account (an NTRIP Client), client account (a person or business) , or a PUSH_In Base Station reservation (NTRIP Server) is created or changed; an automatic email can be sent to the other party (as well as a CC copy to whatever account you set up). You can also have eMail sent to SMS addresses (cellular phones) as well.
Using the eMail Auto Reports menu item, periodic reports can also be scheduled to be created and sent to the SNIP operator or other parties. This provides an easy way to inform your users of their recent connections and usage. Sending eMail can also be set up to alert you when selected critical events occur (such as: Base Station X has gone offline) – a key ability for any NTRIP Caster running 24×7. Adding to the varsity of such reports will be a key feature in the SNIP 2021development roadmap. A set of report templates will allow customization of the report to support operator’s branding needs. In the initial release of the eMail Plug-In (Jan 2021) the auto reports provided are limited, while all manually created reports are fully supported.
Setup Details
In order to use the eMail Services you must have an active eMail Services Plug-In operating on a Pro model of SNIP, see here for further purchase details. Once you have purchased the Plug-In, you will receive two confirmation eMails. The first will have the license key for the Plug-In, which you will enter to active your Plug-In (see the menu: Setup ⇒ Manage Plug-Ins ⇒ eMail Services). The second eMail will have the private eMail account details which you will enter in the dialog below.
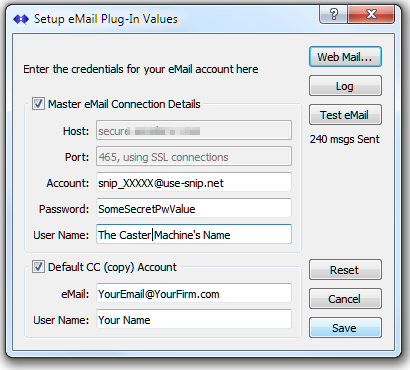
Master eMail Connection Details
The master eMail connection details hold your user account and consists of three editable items:
The eMail Account you were given, in the format: snip_XXXXX@use-snip.net The value XXXXX is a set of digits which are unique to your eMail use. In practical fact your Caster now has an account within the use-snip.net domain. [Note *.net not *.com] As is discussed below, you can simply forward all reply mail to this account to whatever account you prefer (snip_XXXXX@ ⇒ myMail@myCompany.com) using the WebMail control panel.
The Password for that account, assigned when SNIP support staff created the account. You can change this using the WebMail page, but be sure to update the value here as well.
The Human readable User Name you want associated with mail from this account. Typically this is the name of your Caster, or the Firm, or something generic like “NTRIP Support” are entered here. The first time you set up this dialog the “Operator Name” from the Preferences dialog will be entered here, but you can change it as you wish. You can also leave this field blank.
Enter these three values into the dialog.
Every time you send an eMail from SNIP, a copy is also placed in the on-line user account for reference. SNIP sends all eMail using a SSL socket to port 465 on the remote SMTP machine (in other words very securely). In rare instances there may be a need to ensure that the firewall on the machine hosting SNIP allows remote port 465 connections to occur.
Default CC Account
The CC account is used to automatically send a copy of any email to the eMail account you enter. It is most typical to enter the operator or tech support email in these fields. When manually sending mail, a check box to CC to this address is presented each time.
The eMail account you wish to send mail to, in any valid eMail.
The Human readable User Name you want associated with this eMail (can be left blank).
Various Button Controls
The Setup dialog consists of the normal helpful tool-tips; hover over any control for a summary of its use. The use of the six button along the right side are summarized as follows.
Web Mail…
Launches the prefers Browser on the Host machine with the URL for the WebMail interface. The WebMail interface in discussed further below and is used to manage your email account.
Log
Provides a recent summary of eMail sending logs, use for for resolving any sending problems,
Test Mail
Sends a simple test mail to the recipient you enter. Use this button to confirm that the eMail system is operating correctly.
Reset
Resets the user editable fields in the dialog box to those last saved.
Cancel
Cancels the dialog box, without saving (no changes are made).
Save
Saves the dialog box, if the values pass some basic validation. If the current values fail to pass, nothing is saved and the operator is presented with various error messages suggesting how to correct the problem.
Webmail Access
The Webmail access is a simple portal to access your snip_XXXXX@use-snip.net account directly. If you have set up your mail to forward a copy to an email you prefer, you may never need to access it. It provides the normal interface features found with most web mail systems. The image below (click to enlarge) shows an account where a SNIP::STATUS report had been sent as the last eMail.
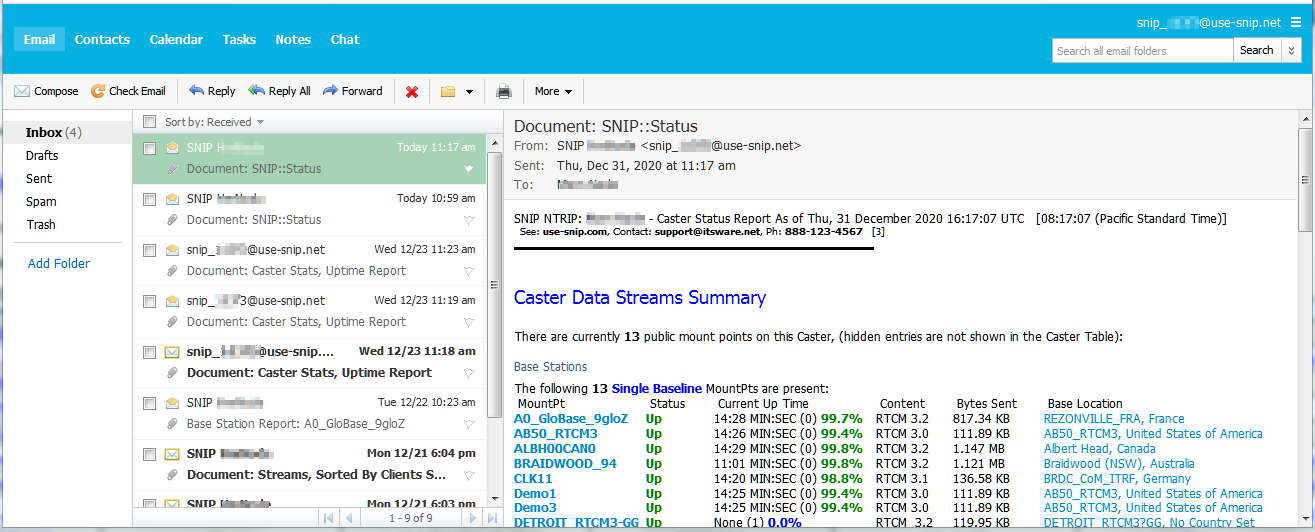
Your web mail account provides a storage limit of 25GB for your sent mail. You can use this to recover eMails after the fact. [As a relative measure of use, if you were to send ~1000 eMails per week with various SNIP reports, you would reach this limit in about 2 years.] If you ever reach 80% of this, an eMail notification will be sent. The default settings are set to delete any spam email after 7 days and to leave all other email. All inbound mail is set to be relayed to whatever eMail address you provide. Simple Calendar services and Chat services are also provided. You can change any of these settings as you desire.
The very first time you log into the Webmail page it will ask you to set up a 2nd method to recover your account password. We advise you to take a moment to complete this.
Usage Hint: If you press the Web Mail button from the dialog and
cannot then remember your account name and/or password,
it is the same value being shown to you in the dialog.
Cut and paste from there.
The eMail Services Plug-In Here, Purchase Details
A One-Month Trial of the eMail Services Plug-In Here, Purchase Details