This article describes how to set the IP value(s) used in SNIP. When you set up the NTRIP Caster on a host machine, you must enter the network IP that SNIP will listen on and reply to the NTRIP Clients (Rovers) and NTRIP Servers (Bases) connection requests on. Often the network IP value that the host machine uses is not the same as the public internet network IP (or DNS/URL name) that other parties use to reach your caster. These values are all set in this dialog.
Often a SNIP NTRIP Caster is run on a machine which does not have a static IP address assigned to it. This article reviews three ways to set the link address used in various reports created by SNIP. If your copy of SNIP operates behind a firewall, or is using Dynamic DNS (DDNS), or uses a router or DSL modem to connect to the internet, or has a DNS entry rather than just an IP address – then use this dialog to map the public IPs values seen by various public reports in SNIP.
The Basics
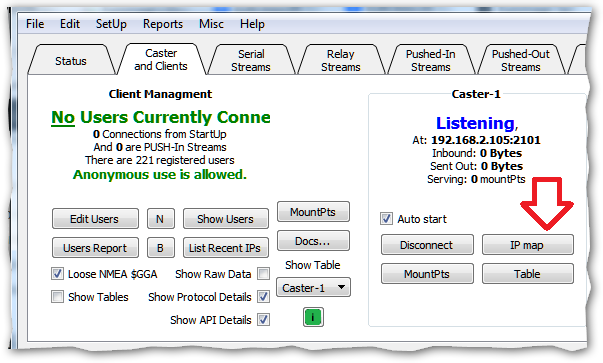
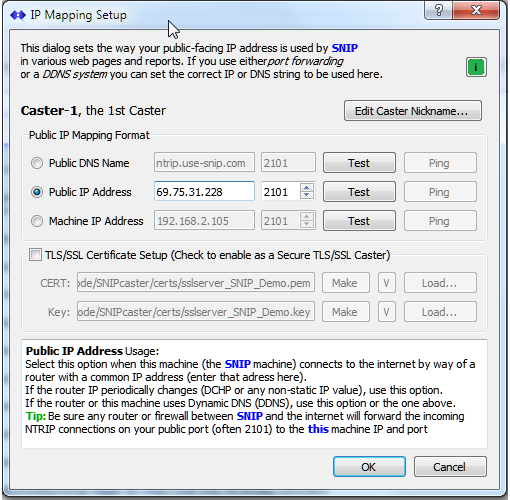
The IP Mapping Setup dialog is reached by pressing the IP Map button found on the Caster and Clients tab. The dialog (shown below with representative values – yours will differ) presents a choice of three editable values which will be used by SNIP in the links found with various reports such as the general STATUS command.
If your SNIP NTRIP Caster uses a static IP then any reports will already correctly link to the caster. You might still wish to use the Public DNS Name option to have those reports use the URL string for your Caster, rather than its IP address.
If your SNIP NTRIP Caster uses IP and/or port forwarding, you should use either the Public DNS Name option (if the the IP has a DNS name registered with it) or the Public IP Address option if you prefer to use IP address values.
Note: If you have a Pro or Enterprise model of SNIP and wish to have a machine name registered using one of the SNIP namespaces (xxx.use-snip.net or xxx.use-snip.org or xxx.use-snip.com or xxx.use-snip.co), please drop us a note at the normal support email. We reserve the right to handle any name conflicts that may arise as we see fit.
Note: If you are using a commercial DDNS service such as ddns.net then the periodic registration and maintenance of the machine name is handled by that provider. Simply enter the name you have registered in the IP Mapping Setup dialog.
In all cases you will also enter the local network card IP in the Machine IP Address field. This is the actual physical IP of the host machine network card. Many (if not most) deployments do not have a static IP but will use a local ‘non routable’ IP with values like 192,168.x.x or 10.x.x.x or 172.x.x.x. If you are using one of these types of values, the traffic that reaches your Caster is either local to the same network, or has been directed to your machine from outside your local network using firewall rules and port forwarding.
Use of the Controls
The selected radio button in the Public IP Mapping Format determines how various reports and links are created in SNIP. Whichever value of the three choices is selected is used in the reports and links.
Note: In older versions of SNIP (previous to Rev 3.07) there was a master on/off control for this feature in Public IP Mapping Format as a checkbox. And you could also enter the host machine IP value directly from the Caster and Clients tab. This process has now been simplified so that all IP settings are handled here. In prior versions the ability to use various IP mapping function was limited in the Lite (free) copy of SNIP, but this limit has now been removed. Now, all models of SNIP use the same simplified controls.
The major choice is which of the three format styles is to be used. The values for each choice are enabled for editing when the radio button is selected. Along the right side of the dialog box is a set of test buttons to allow the SNIP operator to confirm that other parties (on the public internet) can contact and connect to this NTRIP Caster over the public internet using those settings.
Extensive tool tip hints are also provided and these are shown in the textual window at the bottom of the dialog. When one of the test buttons has been pressed, comments regarding what the user should expect to find are then provided (the results are shown in a separate browser window using the default browser of the machine).
The use of the three choices is as follows. Much of this text is also repeated in the tool tips.
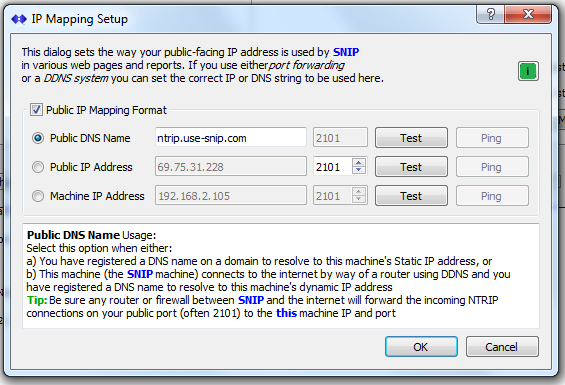
Public DNS Name
Select this option when either:
- a) You have registered a DNS name on a domain to resolve to this machine’s Static IP address, or
- b) This machine (the SNIP machine) connects to the internet by way of a router using DDNS and you have registered a DNS name to resolve to this machine’s dynamic IP address
Tip: Be sure any router or firewall between SNIP and the internet will forward the incoming NTRIP connections on your public port (often 2101) to the machine IP and port.
Public IP Address
Select this option when this machine (the SNIP machine) connects to the internet by way of a router with a common IP address (enter that address here).
- If the router IP periodically changes (DCHP or any non-static IP value), use this option.
- If the router or this machine uses Dynamic DNS (DDNS), use this option or the one above.
Tip: Be sure any router or firewall between SNIP and the internet will forward the incoming NTRIP connections on your public port (often 2101) to this machine IP and port.
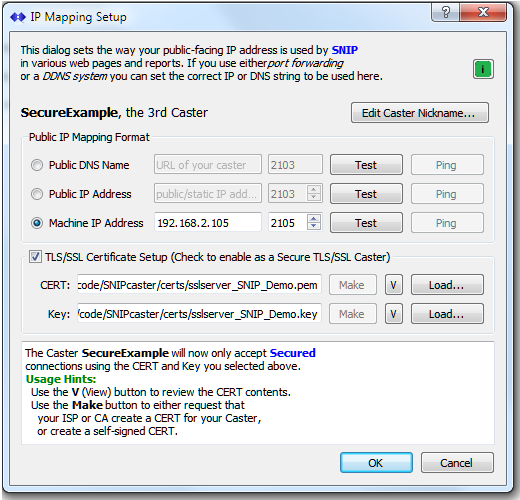
Machine IP Address
Select this option when this machine (the SNIP machine) has a Public Static IP address that is accessible by anyone on internet. Or, if SNIP will only be used within your local WAN.
- This is the address of the network card SNIP is using (in earlier releases it is the the same value found on the Caster and Clients tab)
- Important: You MUST enter a valid network card found on the host machine here, even if you do not select this as the mapping format to be used.
- Do not use ‘local host’ (127.0.0.1) for this value. When SNIP first starts, it will list all the different host machine IPs it finds to the console. The value you select will be listed there.
Tip: Do not use this radio button when port forwarding is being used or if a router is performing NAT services to access the internet.
Test Buttons
Each of the choices also provides a Test button that when pressed invokes a remote NTRIP Client (a service maintained on SNIP cloud based servers at: monitor.use-snip.com). The remote service uses the specific value you have entered to try to access your Caster Table. When this service can see your Caster, so can other parties on the public internet. And you then have confirmation that your settings are correct.
Secure Casters with TLS / SSL
In versions of SNIP from Rev 3.07 onward, this dialog also allows selecting the security certificate that will be used for secure NTRIP Caster connections. The SSL/TLS Secure Sockets Plug-In is required to do this, as well as a valid security certificate (a ‘CERT’) and the private key with which it was signed. SNIP can use either private or public CERTS, and self-signed CERTs are also fine to use.
Older formats
In versions of SNIP prior to Rev 3.07, this dialog contained a master on/off button that controlled the IP mapping process. When off (and Lite models were limited to only off, as this features was disabled) only the machine host IP was used. And that value could be entered on the Caster and Clients Tab.
Multiple Casters
In versions of SNIP running multiple Casters (a Plug-In feature for Pro models), this dialog can be used for each Caster independently.
You can also set the default name of each Caster with the Edit Caster Nickname… button.