How to send a Report or Graphic by eMail
An optional SNIP Plug-In provides the ability to send eMails to your users or to yourself directly from the Caster. Any report or chart / graphic can be sent in this way. This article describes how to use this feature to send an eMail. See also this article on printing reports and graphics.
Sending eMail is a convenient way to inform your users of various reports, graphs, and charts which you may wish to share with them. Whenever a user account (an NTRIP Client), client account (a person or business) , or a PUSH_In Base Station reservation (NTRIP Server) is created or changed, an automatic email can be sent to the other party (as well as a CC copy to whatever account you set up). You can also have eMail sent to SMS addresses (cellular phones) as well.
Initial Setup
Please see this article for setup instructions. In order to use the eMail Services you must have an active eMail Services Plug-In operating on a Pro model of SNIP.
Sending an eMail
In the various report windows there is an eMail button that is used to send that report to another party. When sent, a copy of the email is also saved on your email account as well (there is a 25Gb limit for saved mails; for most users this will last multiple years). In addition you can easily CC the mail to the “CC address” you created during setup process with a check box.
Useful tip: If you are sending mail to the the CC address, you can leave the eMail entry bank and SNIP will insert that address for you. This can be very efficient when sending mail to yourself.
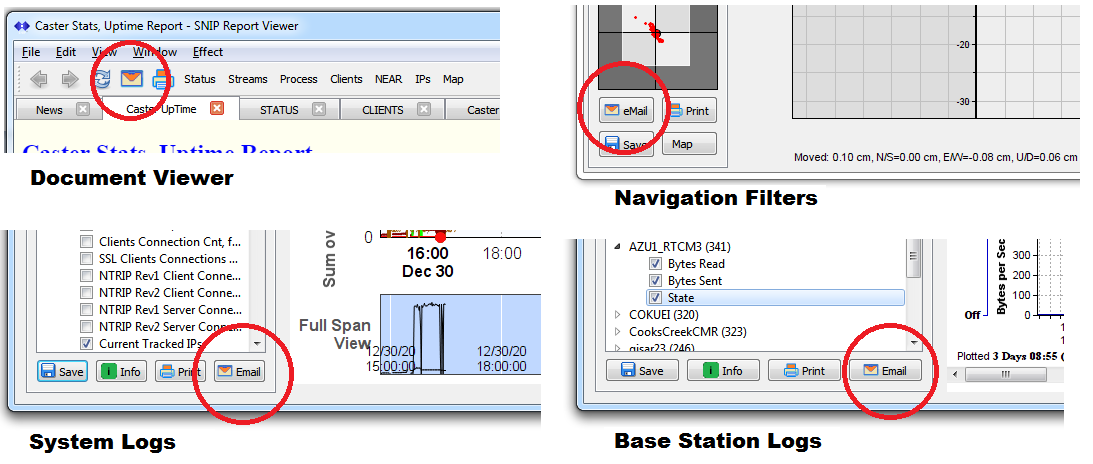
You can find the eMail button next to the Print button in most dialogs. Below are the tool bars for the Document Viewer, the Navigation Filters, the System Logs, and the Base Station Logs dialogs to illustrate this.
Sending Mail
Once the eMail button has been pressed, a dialog is then presented requesting the operator to enter the recipient email address as shown below.
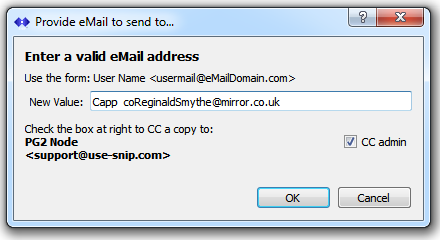
You can enter the name and email in a variety of formats as you wish. The ‘name’ of the recipient is optional but will be used if it is entered. The eMail should be the last item on the line and must be valid itself. The following formats all represent valid email entries (although this is not a valid email).
- Andy Capp <coReginaldSmythe@mirror.co.uk>
- Andy <coReginaldSmythe@mirror.co.uk>
- Andy coReginaldSmythe@mirror.co.uk
- <coReginaldSmythe@mirror.co.uk>
- coReginaldSmythe@mirror.co.uk
If the resulting name and eMail cannot be parsed out (are not valid), no eMail is sent and a note of this is entered into the console log.
If the CC admin box is checked, a copy of the mail is also sent to the party indicated in the adjacent label.
If the eMail is deemed to be valid, the requested report is created, placed into a suitable MIME eMail message and enqueued for transmission. Unless there is a backlog (as can occur when many eMails are created in a short time with automated reports) the eMail is sent out in the next second or so. A note of this is then added to the console log.
[DOCS]: An eMail with the document: Caster Stats, Uptime Report, was sent to: Capp <coReginaldSmythe@mirror.co.uk> [CC to Caster admin]
That is all there is to it.
Tips
In general, html reports and any reports containing tables will be sized to the paper size or screen size on which they are eventually viewed without any sender effort. Reports containing PNG images (most charts and graphics) are sized to the size of the dialog window when created. In other words, if you want an eMail graphic to be larger or smaller or a different display ratio, simply resize the containing window before sending.
Hint: This sizing process can be done for Saved files (in PNG, GIF, PDF, etc.) and for Printed reports as well as for eMail.
The button Web Mail… in the eMail setup dialog will take you to a web interface to see all the eMail you have send and any replies send to that mail. It is most typical to have this mail traffic automatically forwarded to an eMail account you will regularly use. The web interface provides various settings to control this.