This article describes how to add a new Customer Account to the SNIP NTRIP Caster.
Using Customer Accounts is entirely optional but provides a useful way to group sets of User Accounts, or owned Base Stations, or Staff Accounts, to a single legal entity called a Customer.
Said another way; you might create three NTRIP Client accounts for three rover devices, but have these all “owned” by a single Customer Account. For example, “Farmer Bob” (the customer) may have three different NTRIP Client accounts named “FarmallA”, “FarmallB”, and “SuperC” and each of these can have whatever User Account restrictions assigned to them you wish. In a similar way, you can (optionally) assign ownership of specific Base Stations to the Customer Account, thereby granting the Customer Account additional access to manage those base stations using the Web API. And Finally, the Customer Account can also create and manage multiple Staff Accounts to allow other designated persons additional (limited) access to manage the Customer Account resources (users and bases). A hierarchical set of user rights can be set to govern the allowed actions of the each party.
Note: In order to setup and use Customer Accounts the “Enhanced User Management” Plug-In must be present and active. In order to use Staff Accounts the “Web API” Plug-In must also be present and active. And in order to send reports and other details by email, the “Email Support” Plug-In must be present and active. These Plug-Ins can be used in the Pro edition of SNIP.
Create a new Customer Account with the menu command: Setup ⇒ Add a Customer… You can also create a new Customer Account from within the Manage Customer Dialog using the Add… button.
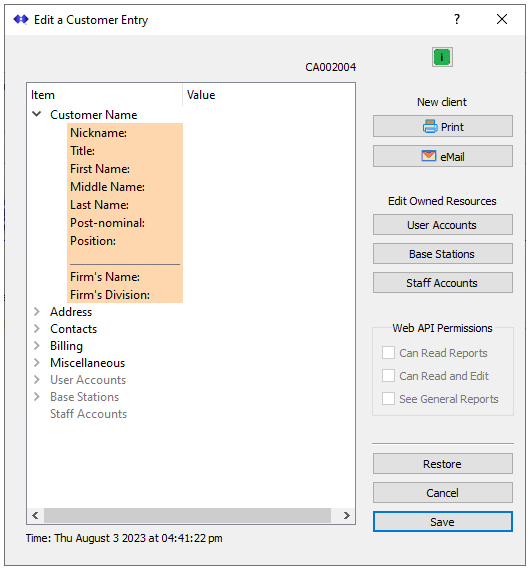
When a new Customer is created (or an existing Customer Account is edited) the dialog below is presented. A tree view displays information organized into eight basic sections. Each will be discussed further in the below text. This dialog is available only on the SNIP Caster desktop, not the Web API, and therefore these values can only be set by the Caster operator (no Customer can change them).
Click on the small arrow at the left side of each item to expand or collapse the contents to show additional details for each heading. In the below image the Customer Name is shown expanded.
Most of this information is optional, and may be left blank (empty) unless your Caster business model has a use for it. Some information is required (the unique “Nickname” of the customer account, a primary contact eMail may be needed, and a list of any User Accounts or Base Stations which are assigned to the Customer). Like the many restrictions that can be added to any User Account, very few deployments will have a need to use all of these fields.
The buttons along the right side manage the users, bases, and staff that a given Customer has (generically these can be considered “resources” owned by the customer account). Here you can also control what “rights” you choose to grant to the Customer Account (generally granting the ability to read data or the ability the read/write/edit such data using the Web API).
Like other SNIP dialogs, extensive tool tips are used; simply hover over the graphical element in question to see additional information about its use.
The various informational items in the Customer Account
The number that appears on the top right side (here “CA002004”) is the internal Customer account number used by SNIP. This is a unique value assigned by the Caster and used to link the Customer to other resources (regardless of any future name edits that may occur).
When/once an entry has been created for the Customer Account, additional summary details appear in the top section. You will see this when you edit an existing Customer account. Status and any warnings appear in the label at the bottom of the dialog. Clicking the “i” icon can be used to bring up this information page in the SNIP knowledge base.
To edit the values in the tree, click on the right side caret to open an editing box, click on that line, and then enter the desired text. When you press the Save button, some of these values will then be validated and compared with other entries on the machine (to avoid duplicates) and any warnings will be presented, if needed.
Customer Name
This section allows entering various details about the name(s) of the customer and/or the firm associated with the account.
Only the “Nickname” is required and that string MUST be unique (no two customers can have the same nickname). The nickname is used in various reports where the full set of names would be too verbose. The nickname is also used when (if) the Customer will log into the Web API to identify the “realm” for that Customer. For this field capitalization (case) does not matter when entered in various Web forms. While SNIP will allow you to create two nicknames that vary only in capitalization, this is generally a very poor practice.
Address
This section allows entering a physical (postal) address for the Customer Account. The time zone the Customer resides in can also be entered (this can be helpful if the Caster’s local time zone is different than the Customers). This section is completely optional.
Contacts
This section allows entering a variety of phone and email contacts for the Customer Account. A secondary contact (name, phone number, and eMail) can also be entered.
The primary eMail is entered here. While this is not a required field, it is a best practice to always add it. Various automatic email warnings will use this value to send eMail to the Customer whenever one of his/her resources experiences repeating problems when making connections to the Caster.
If the Customer will be allowed to access the Caster by way of the Web API (this is set with the controls along the right side and discussed further below) then a primary email MUST be set. If the Web access will be for Staff accounts ONLY and not the primary Customer, then no primary email is required for that use, as each Staff Account will have its own (unique) email.
Billing
This section allows entering a variety of somewhat “free format” billing textual details for use by the Caster operator and any back-office processes. At this time the Caster does not operate on any of these and you can save whatever messages are of value to you. The fields include descriptive items like: Next Invoice, Last Invoice, Details, etc. This section is completely optional.
Miscellaneous
This section allows entering ten “free format” textual details for use by the Caster operator for any use they care to have. This section is completely optional.
User Accounts
This section displays (when expanded) a list of all the User Accounts assigned to this Customer. A Customer Account may have zero or more User Accounts assigned to it.
The section is edited by pressing the User Accounts button (on the right side) and is discussed further in this article.
Base Stations
This section displays (when expanded) a list of all the Base Stations assigned to this Customer. A Customer Account may have zero or more Base Stations assigned to it.
The section is edited by pressing the Base Stations button (on the right side) and is discussed further in several different articles. In the SNIP system of organized “tabs” each different data stream type has it own set of support pages. For example Remote-Relay connection are discussed here, while Push-In connection types can be found here.
Staff Accounts
This section displays (when expanded) a list of all the Staff Accounts assigned to this Customer. A Customer Account may have zero or more the Staff Accounts assigned to it. And each individual Staff account can be disabled or enabled as needed.
The section is edited by pressing the Staff Accounts button (on the right side) and is discussed further in this article.
Various buttons and items along the right side
Save Button
When pressed, this button will save the current values (if they are valid) back and then display the current list of Customer Accounts.
If the one of more of the current values is not valid (is not well-formed or in some place is not a unique value) then a message with the offending entry will be displayed. The value must be corrected before the dialog can be saved.
Cancel Button
When pressed, the current value are abandoned and the dialog is closed.
Restore Button
When pressed, the original values of the Customer entry are restored.
Print Button
When pressed, an html report of the Customer showing all its various values and a listing of its owned resources (User Accounts, Base Stations, and Staff Accounts) is shown in the Document viewer.
eMail Button
When pressed, an html report of the Customer showing all it various values and a listing of its owned resources (User Accounts, Base Stations, and Staff Accounts) is sent by eMail to the Caster owner using the eMail address found in the Preferences dialog.
Editing and Assigning Resources
The next three buttons all bring up dialog boxes to select/ manage / add / remove resources that can be assigned (owned) by the Customer Account.
User Accounts
Press this button to edit the User Accounts that are owned by this Customer Account. Each User Accounts should exist before being assigned. See this article for further details on adding User Accounts.
Base Stations
Press this button to edit the Base Stations that are owned by this Customer Account. The Base Stations should exist before being assigned. See this article for further details on adding Base Stations.
Staff Accounts
Press this button to edit the Staff Accounts that are owned by this Customer Account. New Staff Accounts can be created from within the dialog box. See this article for further details on adding Staff Accounts.
Web API Permissions
This section enables or disables the ability of the current Customer Account to use the Web API to access the Caster and perform various operations. There is also a global on/off switch for all Customer Accounts in the Preferences dialog. This can be used to enable/disable all Customer Account Web API access.
Note: If the checkboxes in this section are all shown as greyed out, then you need to first enable use of Customer Accounts in the Web API (a check box found in the Preferences dialog box).
The Caster provides three Web API access levels of control as follows:
Read Access – The Customer can use the Web API to get reports about his assigned users and bases but can ONLY read this data. The Customer CAN NOT make any edits or changes to the users or bases (the Caster operator must do it).
Read-Write Access – The Customer can use the Web API to get reports about his assigned users and bases AND can submit changes and updates to this data. So both the Caster operator and the Customer make various edits or changes to the users or bases (by way of the Web API).
See General Reports – The Customer can use the Web API to get operational reports about the Caster in general. Reports such as the STATUS and PROCESS report are controlled by this setting. The Caster operator may not desire Customers (or others) to see such internal details, disabling this checkbox will prevent that.
Also; The values set by in this dialog for the Customer are then passed down to any Staff Accounts created for the Customer. In other words, a Staff Account cannot have a level of privilege that the Customer account does not already have. A Staff Account can be MORE restrictive (this is set in the Staff dialogs). For example, a Customer may be able to both read and write on its own resources, yet one of its Staff Accounts may be only be allowed to read, while another Staff Account might be allowed to do both read and write.
Can Read Reports
When checked the Customer is allowed to request read-only Web API reports. When unchecked no log-in to the read Web API will be granted.
When first checked a password dialog is presented. When first used an auto-generated password is created. The password can be edited as desired but must be one word and at least 4 characters long.
Can Read and Edit Reports
When checked the Customer is allowed to request various read and write Web API reports and can post changes to users and bases. When unchecked no log-in to the read and write Web API will be granted.
When first checked a password dialog is presented. When first used an auto-generated password is created. The password can be edited as desired but must be one word and at least 4 characters long.
Can See General Reports
When checked the Customer is allowed to request various report such as STATUS and PROCESS.
If unchecked (and if the these report are also unchecked – hence not providing them for all other users in the Preferences dialog), then requests for them will be ignored and various button to request them will NOT be present in the returned reports.
More Information
Additional knowledge base articles on this and related topics can be found in the links below.