The User Account Dialog is used to manage all the User Accounts (NTRIP Client accounts) you allow to access your NTRIP Caster. Unless you are running your Caster in an open mode, then every device that connects the Caster must have an active user account to connect and get base station data.
This article discusses how to use the User Accounts dialog to manage your users. You can add new users and set-up various usage restrictions, all of which is discussed in this article. If the Advanced User Management Plug-In is present, each User Account can (optionally) be “owned” by a Customer Account you create, which is described further in this article. Finally, a summary of all the active connected users is displayed by using the Connected Users Dialog, see this article for details. [If you are using the Web-API you can also see connected users over a web interface, as well as perform many common management functions to add/remove/edit User Accounts]
You can open this dialog by clicking on Edit Users from the Caster and Clients tab, or with the menu command Setup ⇒ Manage User Accounts…
This dialog can be divided into three primary sections, the controls in each are discussed in more depth below.
The top section shows various global settings for user access, visual controls regarding how the users are displayed in the table, and two buttons for import and export of the user accounts. The normal “i-button” for information and help with this dialog is also present and will display this knowledge base page from the SNIP Caster in the document viewer when clicked.
The middle section shows all the user accounts with various details in a table. These can also be sorted by clicking in the column headers. Various tool-tips provide more details for each entry.
The bottom section contains buttons which are used to manage the display and to add or edit specific selected user accounts.
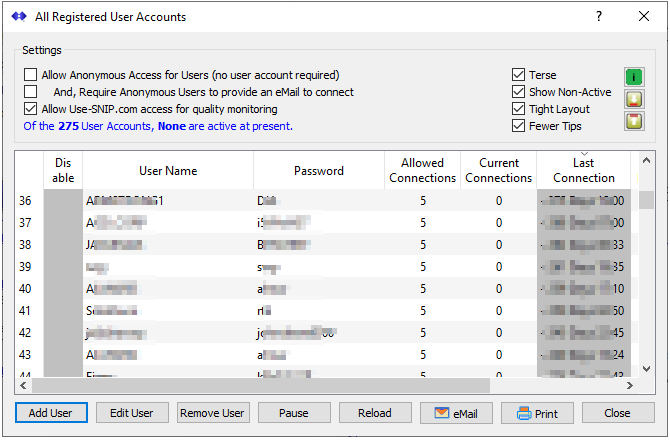
The top section
The left section contains three check boxes that control how users and other parties will access your Caster.
The most import of these is the checkbox labeled:
Allow Anonymous Access for Users (no user account required)
- When this is checked any remote party will be able to access the Caster and request base station (mountPt) data from it. Your Caster is “open” to others.
- When this is UN-checked only those with a valid User Account you have created will be able to access the Caster and request base station (mountPt) data from it. And they will be limited in this by any restrictions you have established for that user account. Your Caster is “closed” to others. This is the normal mode of operation.
The checkbox labeled And, Require Anonymous Users to provide an email… is only used when operating in the open mode. When checked, the Caster will reject any connection attempt when the user account name is not a valid looking email account. This is used to ensure that the Caster can send back advisory emails to the connecting user when persistent errors in the connection process occur.
The checkbox labeled Allow Use-SNIP.com access for quality monitoring can be left checked or not. This is only used to support unusual deployment problems. The SNIP technical support staff will not access your machine without your express prior consent.
A current status line (typically in a blue font) is also displayed.
The middle section contains a number of checkboxes that control how the table is to be displayed.
Terse causes the table to have fewer summary details displayed. When UN-checked the table also displays a lifetime summary for each user account of
- Total connection counts
- Total accumulated connection time
- Total data ever sent to the account
- Total data ever received from the account
- Total number of NMEA $GGA sentences ever received from the account
Show Non-Active shows or hides User Accounts that are not actively connected at the current time. See also the the Connected Users Dialog for a simple way to display active connections, see this article for details.
Tight Layout causes the line spacing in the table to be smaller so more lines can be viewed.
Fewer Tips lowers the number of details and tool tips created for each entry, resulting in a minor saving in rendering speed.
Finally, there are three icon buttons along the right side as follows
The small “i-button” opens this page in the document viewer when pressed for on-line help.
The middle downward arrow button allows importing a list of User Accounts from a tab separated text file.
The bottom upward arrow button allows exporting a list of User Accounts into a tab separated text file.
The middle section
This section contains a table that shows all the user accounts, sorted by whatever column header was last clicked (click twice to reverse the sorting order for a column). For example, you might click on the column “Last Connection” to see which accounts were most recently connected (or are connected at the moment).
You can select an entry to operate on it. You can then right-click for a pop-up menu with commands to edit, remove, or get a report for that entry. Or you can use the buttons found at the bottom of the dialog for these operations.
Aside: You can also get a summary report for a user by using the menu command
Reports ⇒ Accounts ⇒ Single User Account Report and then selecting the user of interest from the drop-down menu.
The bottom section
This section contains various buttons that operate on the currently selected user account or the dialog itself as follows.
Add User, Used to create a new user account, described further here. If you have the “Enhanced User Management” Plug-In you can also add a wide variety of access restrictions to the user account.
Edit User, Used to edit the values of the selected user, described further here. If you have the “Enhanced User Management” Plug-In you can also edit any of the access restrictions for the user account.
Remove User, Removes the selected user after presenting a simple “are you sure” dialog.
Pause, Pauses the automatic updating of the user table. This is useful when examining the table and not wanting the data (or the current sorted order) to change. The default behavior is to update the table with the most current data every 5th second.
Reload, Reloads and updates the table after a Pause has been invoked.
eMail, Sends a user report for the selected user to the entered email address, and can CCed the Caster admin email account as well. If the selected User Account is assigned to a Customer Account, the customer’s primary contact email is entered as the default (which you can edit). This feature requires a Pro model of SNIP and the eMail Plug-In to be present.
Print, Displays the user report for the selected user as a web page in the document viewer. The user can then print the report (if the host machine supports printing), or save it as a file, or send it by email (if the the eMail Plug-In is present).
Close, Closes the dialog.