The below list provides quick links to FAQs regarding managing Users
See this article for a similar set of links for Base Station tasks
See this article for a similar set of links for IP related tasks
See this article for a summary of these links.
User Tasks
See all connected users
Use the Menu command: Setup ⇒ Display Current Users…
This will display the Connected Users dialog, all currency connected users will be shown.
If you have many users frequently logging on, you may want to use the Pause and Reload button to freeze the display. You can sort the order of the display by clicking on the table headers.
If you hover the mouse over the user you will see a tool tip with the NTRIP Client agent. If you hover the mouse over the base, you will see a tool tip with the same information you see when hovering over a base in the main tabs.
See a specific user
Bring up the Connected Users Dialog (Menu: Setup ⇒ Display Current Users…).
Right click on the user entry of interest, select User Report from the pop-up context menu.
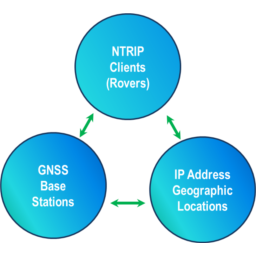
You can also plot recent movements and get a Base Station report or and IP report from the pop-up context menu. Generally, Users / Bases and IPs are cross linked to each other.
Plot the Movement of a specific user
First view the connected user over the Web API. Do this: First Login from an authorized account. From the Web API top page, go to the Users section and filter and select this user by entering a name string. If no filter text is entered, all current users are shown. A list of all users matching the filter is then presented. The only users which the Customer Account is allowed to manage are shown. The master Admin account always shows all users. The Web API Plug-in is required for this feature.
Click on the user of interest (the button on the left of the table with the user name in it). A current user report is then presented. Here is a representative user report.
The middle section of the report shows the user’s recent movements in a Google map which you can pan and zoom. Refresh the page (with the “Refresh” button) to update the plot. You can obtain the raw NMEA -183 $GGA sentences in another page with the “Show past X sentences in new tab” button. You can pass this to other 3rd party tools for processing when desired.
See/Edit/Delete a specific user report, over the Web
First Login from an authorized account. Do this: From the Web API top page, go to the Users section and filter and select this user by entering a name string. If no filter text is entered, all current users are shown. A list of all users matching the filter is then presented. The only users which the Customer Account is allowed to manage are shown. The master Admin account always shows all users. The Web API Plug-In is required for this feature.
Along the right side of the table are to buttons “Edit” and “Delete” if the account is authorized to have read/write access to the users. If the account is authorized to have read-only access , the button “Show” is shown instead.
Manage All User Accounts
Use the Menu command: Setup ⇒ Manage User Accounts…
This will display the Client List Dialog, a table of all user accounts, regardless of currently being in use or not. A variety of historical details (lifetime number connections, when the user was last connected, etc. are also shown when the Terse checkbox is unchecked)
For each User Account entry in the table you can edit, remove, or get a report for each user.
You can also add new users.
Add a new User
Use the Menu command: Setup ⇒ Add a User
This will display the Client List Dialog, and automatically press the Add User button. This then displays the new user dialog where you can enter the name of the User Account, the password and other details. Various user restrictions are also entered here, if the Caster has the Enhanced Users Management Plug-In. When this Plug-In is active you can also create Customer Accounts and assign ownership of the new User account to a Customer Account.
Add a user, over the Web
First Login from an authorized account. From the Web API top page, go to the Users section and press the button marked Add New User Account (NTRIP Client). The Web API Plug-In is required for this feature.
This will display a preliminary page where you will enter the User Account name (the name the NTRIP Client will use to log in with). The value you enter is then checked for suitability and when acceptable you move on to the next step.
Within the Caster, every User Account name must be unique and only certain characters are allowed to be used. When you press Submit, this is checked for any any problems are reported back to the user. If a name is similar to another name, or otherwise ill-advised a recommendation of similar names or what to change is provided. You can override this if desired.
Upon creating an acceptable name another web page is presented where you can fill in details such as the user passwords (one is suggested but you can change it), the number of allow simultaneous connections, etc. On completion a confirmation email is sent to the Caster Admin (and the owning customer if used), if the eMail Plug_in is active.
Disconnect a User
Use the Menu command: Setup ⇒ Display Current Users… to bring up the Connected Users Dialog.
Right click on the user entry of interest, select Disconnect User from the pop-up context menu.
It is very likely the user’s NTRIP Client software will then reconnect (or try to reconnect) in the next few seconds. If you need to block a user from reconnecting, see the below.
Block a User from connecting
There are several ways to accomplish this. You might also want to block the source IP from connecting.
If the Caster has the Enhanced Users Management Plug-In:
Go to the user of interest (menu: Setup ⇒ Manage User Accounts… then select the user.
Check the box Disabled in the upper right corner of the first tab and save.
Or, you can set a time restriction for the user which has already passed.
If the Caster does not have the Enhanced Users Management Plug-In:
Go to the user of interest (menu: Setup ⇒ Manage User Accounts… then select the user.
Change the user’s password to a new value which the user will not know or guess.
We suggest that you use a common word such as “Block” you append to the password.
See all users of a specific Base Station
The Web API Base Station report provides a table of all connected user accounts. From these entries you can press either of two buttons for each user. The button on the left side provides a user report. The button on the right plots the user’s recent movement on a map. If no movement has been reported, it plots the estimated IP source location. When no reported NMEA $GGA is present, a reverse Geo lookup of the IP is used. The individual users are only shown if the Web API account is authorized to see them, otherwise this section is not present (only the count of users is shown).
Plot all users of a specific Base Station
The Web API Base Station report also (see this link) provides a table of all connected user accounts. Press the button marked Display Base and Users in a Map just above this table, and a google map is creating showing all users within 250KM of the base (see this link). Connected user which are further away, or for which no location can be determined, are listed in a table below the map. The base line distance from the user to the base is also shown. Here are two representative examples of this: Just the Map, The Map with Tooltips. (links TBD) This button is only available if the user is authorized to see the Base Station users.
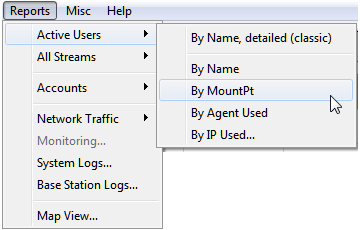
Sorted User Reports
There are also several reports which group and sort multiple users. All of these can be reached with the menu command: Reports ⇒ Active Users as shown below.